Showing posts sorted by relevance for query sql. Sort by date Show all posts

Wednesday 5 June 2013

Sunday 13 July 2014

Getting Started and Deploy Asp.net App with Appharbor -- Cloud Platform as a service

CLOUD - So first thing we need to know here is what is a Cloud ? and how it is useful to us to use Cloud. Cloud is long network of interconnected computers that allow the avaliability of data over internet all the time .Cloud help to make our data secure and allow the user to run its application on cloud with full scalability and availaibility . We say it provides avalaibility of 100% because Cloud follows the approach of Replication of data to the other nodes to make ensuring the full availaibility of data even when the server that is actually assumed to have data or application is not availaible .

If we are accessing an Application on Cloud and at that particular time that server is down so how our Application Deployed on Server could be accessed Cloud Computing gives answer of this question By Cloud Computing when we deploy our application on cloud then cloud computing will replicate your application to other connected nodes also so that your application will be availabile when one of node is off and unable to provide the access to your application

AppHarbor is a fully hosted .NET Platform as a Service. AppHarbor can deploy and scale any standard .NET application to the cloud. AppHarbor is easy and simple to use . It provides number of additional addons for database and other applications to add it to your application. Here I am going to tell all the procedure to create and deploy asp.net application to appharbor cloud service.

Step1

Start your Browser and Put this Url in your address bar and Navigate to AppHarbor Website :- https://appharbor.com/ and Hit Enter

Step2
Click on  Get started Button . Then do simple signup procedure .Then Login to your AppHarbor Account.

Step3
After login Click on Your Applications Menu item on Top Menu Bar and Create a New application by supplying a name for the application Then Finally click on Create New Button


Step4
Now New application is successfully created on cloud . Now for deploying a .Net application with Sql Server database We require to add Sql server as a Addon to Our cloud App

Step5
Now click on Add Ons on sidebar Menu Then Scroll down and find Sql Server and Click on it.


Step6
Now SQL  SERVER Add details are shown Click on Free Install button . Then SQL SERVER add on will be installed for your application to use sql server database with .net application in cloud


Step7
Now on SQL SERVER Installation Success screen click on  sql server


Step8
Then click on Go To  Sql Server . Now your sql server Instance Details will be shown . The most important thing we need is connection string of database instance

Step9
Copy this connection string we will require it in Further steps

Step10
Now open your Visual Studio Command Prompt . It will be availaible in Microsoft visual studio 2010/2012 folder , if not found you can comment here on this post

Step11
Write the following command on this :-
 aspnet_regsql -A all -C "place your copied connection string here"     Now hit enter


Step12
Now Open Visual studio Click on File Click on New Project Choose ASP.NET WEB APPLICATION give it a Name and give proper save path like I give "C:/WindowsApplication3" and Hit Ok


Step13
Now Visual Studio will Present you with practice project already having some coded files .

Step14
Now open Web.Release.config file Uncomment the connectionstring tag and Replace the name of connection add tag to  "ApplicationServices" and Paste the connection we have copied earlier here and finally Press Ctrl + s to save all content . Now all work with visual studio is done.  Just  Run you application on localhost to know its working fine or not and it also compile all the code that is must required to deploy app on appharbor


 Step15
Now Open Git Bash If you have not installed it yet then wait for next article in which i will tell how to install Git Bash

Step16
After opening Git Bash Navigate to directory where you have saved your .net project like I have saved it in "C:/WebApplication3" . Use this command to go to this directory

cd c:/WebApplication3             Then Hit enter


Step17
Now Run following command to initialize Git Repository
 git init


Step18
Run following command to add repository to Git
git add .


Step19
Run following command to commit your data to Git repository
git commit -m "Added Project To Git:"


Step20
Sometime It may ask you for your Email Address pass it using following command
git config --global user.email "yourmail@example.com"

Step21
Now Clone your git Repository for that we require Repository Url for that Go to Appharbor.com then click on your applications Then Click on Application you have created Then in Sidebar click on   Repository Url then it will be automatically copied to your clipboard

 Step22
Now run the following command  :-
git remote add appharbor "paste copied url here"    ...........then hit enter


Step23
Now push your data or application to cloud or Git Repository by using following command
git push appharbor master

Step24
Now it will ask for password then enter password of your appharbor account and Hit Enter Now it will copy all files to Git Repository


Step25
Now your Application is successfully deployed to cloud To check it online you can first refresh your webpage where you have opened Appharbor account Then go to application we have created on appharbor and click on Hostnames and you can see a url there click on it or open it in new  tab it will show your website that you have uploaded

Wednesday 19 June 2013

Declare Variable in SQL


VARIABLES :- Variables are particular amount of memory area that are used to store the data values required to get producing the desired output from the program or SQL query . But Before using or allowing these variable to hold the specified data values we must declare them . The Declaration Statement of variable also tells the type of data that the variable will hold.


Wednesday 7 December 2016

Difference Between Where and Having Clause


The WHERE clause does not work with aggregates like SUM,Count etc.

The SQL above will not work, because the where clause doesn’t work with aggregates – like sum, avg, max, etc.. Instead, what we will need to use is the having clause. The having clause was added to sql just so we could compare aggregates to other values – just how the ‘where’ clause can be used with non-aggregates. Now, the correct sql will look like this:

Many time i have seen code where Having and where clause are misused see Examples Below -

BAD SQL:
select employee, sum(bonus) from emp_bonus
group by employee where sum(bonus) > 1000;

GOOD SQL:
select employee, sum(bonus) from emp_bonus
group by employee having sum(bonus) > 1000;


Difference between having and where clause

So we can see that the difference between the having and where clause in sql is that the where clause can not be used with aggregates, but the having clause can. One way to think of it is that the having clause is an additional filter to the where clause.

Sql Standard Theory says WHERE Clause restricts the result set before returning rows and HAVING restricts the result set after retrieving all records.That's why WHERE is faster as compared to Having and that's why having is not used more commonly or always as that of Having so it should used in circumstances where it is necessary to use having and nothing else is possible like as in case we are using aggregate functions


Monday 17 June 2013

Thursday 18 December 2014

Import dbf database in sqlserver


Steps For Importing Dbf database into Sql Server

There is no appropriate way or direct way to do that but nothing is impossible so there is workaround that can be done to perform this task . Here is the steps :-

  • First we have to convert the .dbf format data into .csv format data
  • Then depending on table structure Create the Table in database one by one 
  • Then using import bulk options of sql server that accept the data in csv format we can easily insert data in sql server

Convert DBF to CSV

DBF Converter allows you convert a single dbf file or folder with dbf files to csv format from GUI or command line.
1. Select the dbf file or foder with dbf files for batch conversion.
2. Select the output csv file or folder for csv files for batch conversion.

Download Software 
dbf to csv conversion


3. Preview, select options for sorting, filtering data (if necessary)
You can also select/unselect columns, set order for columns.
common options for dbf to csv conversion

4. Select options for csv format:columns delimiter, rows delimiter (if necessary), and click "Finish"

CSV file format options


Import CSV File Into SQL Server Using Bulk Insert


 CSV stands for Comma Separated Values, sometimes also called Comma Delimited Values.

Steps For Importing CSV in Sql server 

  • Create The table whose data we are going to import into database

USE TestData
GO
CREATE TABLE
CSVTest
(ID INT,
FirstName VARCHAR(40),
LastName VARCHAR(40),
BirthDate SMALLDATETIME)
GO


where TestData is database name and CSVTest is table name
  • I assume your .Csv file lies in c:\csvtest.txt and it contains data like this

    1,James,Smith,19750101
    2,Meggie,Smith,19790122
    3,Robert,Smith,20071101
    4,Alex,Smith,20040202


  • Then Run the following script in the query windows of sql server . Make sure your paths given are correct to .csv file

    Code


    BULK
    INSERT
    CSVTest
    FROM 'c:\csvtest.txt'
    WITH
    (
    FIELDTERMINATOR = ',',
    ROWTERMINATOR = '\n'
    )
    GO
    --Check the content of the table.
    SELECT *
    FROM CSVTest
    GO
    --Drop the table to clean up database.
    DROP TABLE CSVTest
    GO

    Snapshot


Wednesday 7 May 2014

sql insert , Update , delete using c#


To connect Database from your Windows Application is required  to make Application for querying the database and retrieve the desired result from database . Database in widely used in management software's  and various applications to save record and search the record .

Database dependent applications are widely used in the market . ERP projects of organisation are highly Database dependent applications . The main two types of databa se that are widely used in .NET Applications :-

* Microsoft Access Database
* MSSQL Server ( Microsoft Structured Query Language )


The main Languages used in .NET Platform for connecting windows application to database are :-

* C#
* VB#

Sql ( Structured Query Language ) is most widely used Database . It is free and Opensource Database . It has simple query structure to Manipulate data from database in Database applications 

To Learn About SQL and how to learn SQL you can go to following links first then go forward :-

SQL Tutorial with Examples and snapshots

insert , update , delete , select queries sql

Download Database Script file and execute it in your SQL Server

Steps To Execute this Script file -

1. Download Script file from link below .

2. Now open it with MsSql .
3. Now Create Database Named  'Accounts_database' in MsSql server 
4. Now select this database from Dropdown 
5. And Execute the Script code by clicking F5 .

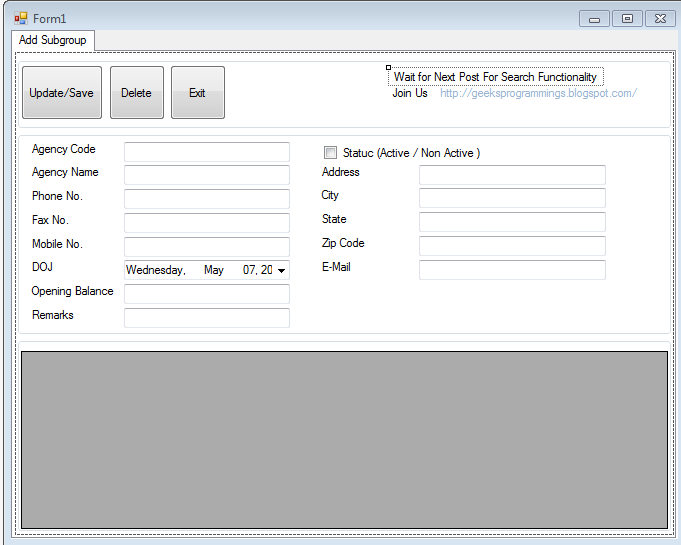
Design of Form 

Download Complete Project File


1. In Design We have some Fields to be filled to insert Data To database

2. We are having 3 Buttons - One for Update and Insert Operation , Second For Delete Operation and Third for Exit or close form

3. We are using Datagrid View to Instantly Showing The data in database and it is updated when we insert new data to database or we delete data from database

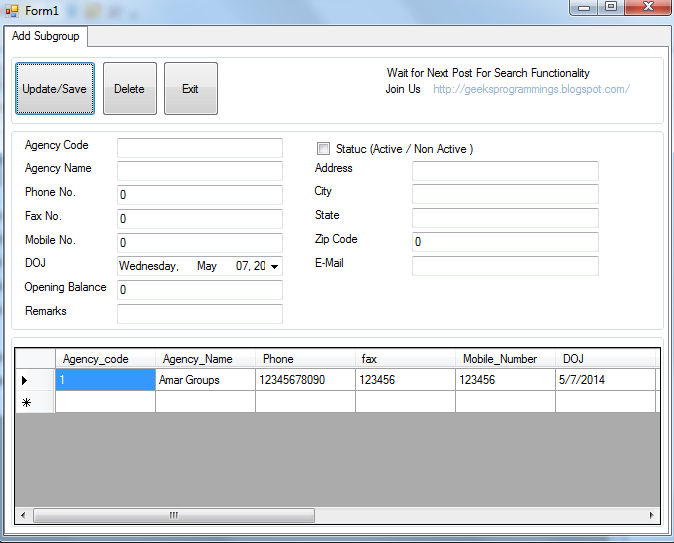
                                                   Insertion/Updation In Database 


1. For insertion of data Fill the fields on form Only Code and Agency Name is required and rest of the fields are optional fields


2. Now you can see filled data is successfully inserted and it is immediately shown in below datagridview


CODE For Insert/Update


 try


 {
                SqlCommand cmd1 = new SqlCommand("select * from Agency_detail where  Agency_code=" + textBox1.Text, con);
                SqlDataAdapter da1 = new SqlDataAdapter();
                DataTable dt1 = new DataTable();
                da1.SelectCommand = cmd1;
                da1.Fill(dt1);
                if ((dt1.Rows.Count > 0) && (dt1.Rows[0][0].ToString() != ""))
                {
                    if (MessageBox.Show("ID Already Exist Do you want to Update It", "Confirm", MessageBoxButtons.YesNo, MessageBoxIcon.Question) == DialogResult.Yes)
                    {
                        SqlCommand cmdupdate = new SqlCommand("update Agency_detail set Agency_Name=@p1,Phone=@p2,fax=@p3,Mobile_Number=@p4,DOJ=@p5,opening=@p6,Remark=@p7,Address=@p8,city=@p9,state=@p10,zip_code=@p11,email=@p12 where Agency_code=" + textBox1.Text, this.con );
                        cmdupdate.Parameters.AddWithValue("@p1", textBox2.Text);
                        cmdupdate.Parameters.AddWithValue("@p2", textBox4.Text);
                        cmdupdate.Parameters.AddWithValue("@p3", textBox3.Text);
                        cmdupdate.Parameters.AddWithValue("@p4", textBox8.Text);
                        cmdupdate.Parameters.AddWithValue("@p5", dateTimePicker1.Value.Date);
                        cmdupdate.Parameters.AddWithValue("@p6", textBox6.Text);
                        cmdupdate.Parameters.AddWithValue("@p7", textBox5.Text);
                        cmdupdate.Parameters.AddWithValue("@p8", textBox17.Text);
                        cmdupdate.Parameters.AddWithValue("@p9", textBox16.Text);
                        cmdupdate.Parameters.AddWithValue("@p10", textBox15.Text);
                        cmdupdate.Parameters.AddWithValue("@p11", textBox14.Text);
                        cmdupdate.Parameters.AddWithValue("@p12", textBox13.Text);

                        //con.con.Open();
                        cmdupdate.ExecuteNonQuery();
                        MessageBox.Show("Updated");
                        retrieve_data();
                        clearall();
                    }
                    else
                    {

                    }
                }
                else
                {

                    if ((textBox1.Text != "") && (textBox2.Text != ""))
                    {
                        SqlCommand cmd = new SqlCommand("insert into Agency_detail values(@para1,@para2,@para3,@para4,@para5,@para6,@para7,@para8,@para9,@para10,@para11,@para12,@para13)", con);
                        cmd.Parameters.AddWithValue("@para1", Convert.ToInt64(textBox1.Text));
                        cmd.Parameters.AddWithValue("@para2", textBox2.Text);
                        cmd.Parameters.AddWithValue("@para3", Convert.ToInt64(textBox4.Text));
                        cmd.Parameters.AddWithValue("@para4", Convert.ToInt64(textBox3.Text));
                        cmd.Parameters.AddWithValue("@para5", Convert.ToInt64(textBox8.Text));
                        cmd.Parameters.AddWithValue("@para6", dateTimePicker1.Value);
                        cmd.Parameters.AddWithValue("@para7", Convert.ToDouble(textBox6.Text));
                        cmd.Parameters.AddWithValue("@para8", textBox5.Text);
                        cmd.Parameters.AddWithValue("@para9", textBox17.Text);
                        cmd.Parameters.AddWithValue("@para10", textBox16.Text);
                        cmd.Parameters.AddWithValue("@para11", textBox15.Text);
                        cmd.Parameters.AddWithValue("@para12", Convert.ToInt64(textBox14.Text));
                        cmd.Parameters.AddWithValue("@para13", textBox13.Text);
                        //con.con.Open();
                        cmd.ExecuteNonQuery();
                        retrieve_data();
                        clearall();
                    }
                    else { MessageBox.Show("Agency ID and Name Must Required"); }
                }
            }
            catch (Exception ex)
            {
                MessageBox.Show(ex.Message);
            }


Deletion Of Data


To Delete data or  record from database :- 

1. Enter the Required fields :- ID and Agency Name of Record to be deleted 

2. Then press delete button and data will be deleted

3. It will be immediately shown as deleted in datagridview


CODE For DELETE


 try
            {
                SqlCommand cmd = new SqlCommand("delete from Agency_detail where Agency_code =@code", this.con);
                cmd.Parameters.AddWithValue("@code", Convert.ToInt32(textBox1.Text));
                //con.con.Open();
                cmd.ExecuteNonQuery();
                retrieve_data();
                clearall();
            }
            catch (Exception ex)
            {
              MessageBox.Show(ex.Message);

            }


Thursday 6 June 2013

Wednesday 16 November 2016

SQL Server Public Preview available on Ubuntu


Microsoft has just announced its public preview of the next release of SQL Server, and Canonical is delighted to announce that this preview is available for Ubuntu.

Moreover, with SQL Server on Ubuntu, there are significant cost savings, performance improvements, and the ability to scale & deploy additional storage and compute resources easier without adding more hardware.

Read Complete Details Here -

Full Article details Sql Server Public Preview Available on Ubuntu

Download Sql Server on Linux 


Thursday 17 November 2016

Table Valued Functions in Sql


What are Table Valued Functions in Sql ?


There are two types of “User Defined” fucntions in sql server
  1. scalar function ( that returns single value in response to function call )
     2. inline table valued ( that returns function result in tabulated form but query can single lined e.g.

     3. return (select * from table_name).

1. Inline Table Valued Functions
If function is made to execute a select query with or without parameters and return result as table type it comes in category of Inline table valued functions.
Sql Code Example -


CREATE FUNCTION GetAuthorsByState( @state char(2) )
RETURNS table AS
RETURN (SELECT au_fname, au_lname FROM Authors WHERE state=@state)
GO


2. Multi-statement table valued Functions

Multi-statement table valued that returns function result in tabulated form but query may have multiple statements that can make changes to query and return the tabulated data.

If functions is made to execute multiple sql statements including insert, update statements etc and return result as table type then it comes in category of Multistatement table valued functions

Example

CREATE FUNCTION GetAuthorsByState( @state char(2) )
RETURNS
@AuthorsByState table (
au_id Varchar(11),
au_fname Varchar(20)
)
AS
BEGIN
INSERT INTO @AuthorsByState
SELECT au_id,au_fname FROM Authors WHERE state = @state
IF @@ROWCOUNT = 0
BEGIN
INSERT INTO @AuthorsByState VALUES ('','No Authors Found')
END
RETURN
END
GO

Tuesday 18 June 2013

Create Functions in SQL

Functions provide a good way to group some set of statements under a particular valid Function -Name that can used in various portions in Program . Functions allows us to use particular set of statements that will be used a number of times in different portions of program by single name. A particular set of statements used to perform specific function and

Thursday 17 November 2016

what are CTE? When and Why To Use CTE in SQL ?


What are CTE in SQL ?

CTE are Common Table Expressions first introduced in Sql Server 2005. It is basically a result set or result holder or separate plugin / extension that can hold some complex query separately from main query and supply the named result set or result holder name in place of that complex query in main query.

It really improves complexity of complex queries. It is specially used in queries that contains complex sub-queries in them. Using them makes our query more concise, improves readability of query and makes it easy for maintainable for long time for future use.

CTE always start with Semicolon preceeded by 'with' keyword and CTE are temporary result holders and are removed form memory after query executed its life is only during query is executing.

When To Use CTE 

CTE is helpful to be used in Below two Conditions -


  1.  In order to reduce complexity of query with complex subqueries that will make code easy to read and maintain.
  2. Very helpful to create Recursive query if required in some cases.


you can read more about recursive queries with CTE on link below -
Read More About How To Use Recursive Query With CTE

Why We use ; ( Semicolon ) in start of CTE

It is actually to ensure previous statement before with / CTE are terminated. Most of times
we use semicolon before with keyword in CTE as we don't know what is before CTE.

Example - Without semicolon may create problem in below code in some StoredProcedure

DECLARE @foo int
WITH OrderedOrders AS
(
    SELECT SalesOrderID, OrderDate from Orders;
)

Above query will create error in Stored Procedure as DECLARE @foo int is not ended with
semicolon and CTE's with keyword is not ended with ; ( Semicolon ). Better way will  to write this query in stored procedure or anywhere is below -


DECLARE @foo int
;WITH OrderedOrders AS
(
    SELECT SalesOrderID, OrderDate from Orders;
)

Now in this case semicolon before WITH Keyword will terminate previous statement first and then execute CTE

Friday 1 August 2014

How To use Crystal Reports in Asp.net


Download zip code file  for Crystal Report Demo App
Download Code For How To use Crystal Reports in Asp.net

Setting Up Sql Server Database 

  1. Open you Sql Server Management Studio
  2. Connect to SQl Server
  3. Then  in Right panel Right click on Databases and Click on New Database
  4. Now A New Dialog Box Appears 
  5. Fill Database name: TestReports and Hit Enter . Now Table will be successfully created

  6. Now in the Query window execute the following scripts to create table

  7. After successfull creation of tables insert some dummy data in tables using following query code

  8. Now Our Database work is over Now we go to Visual Studio for code

Now Do Code in Visual Studio
Start your Visual Studio .Click on New project choose Asp.net Web Form  Application and Give a appropriate name and choose location and Hit Enter .


Getting Dataset Ready For Report

  1. Right click on Project Folder in solution Explorer and click on Add then in further sub-menu click on New item

  2. Now a Popup window appears scroll and choose DataSet give name "Customers" and Click on Ok to add DataSet
  3. Now Customers Dataset will be added in solution explorer . Now Double click on it 
  4. It will open DataSet Designer Now right click on and create new DataTable 
  5. After Creating DataTable it will be empty by default now we will add column to it similar to our column in table in database 
  6. Right click on DataTable that we have created and Create new Column and give it name try to give the name similar to name of columns in Table in Database


Adding Crystal Report

  1. Right click on Project Folder in solution Explorer and click on Add then in further sub-menu click on New item 
  2. Now a Popup window appears scroll and choose Crystal Report give it name and Click on Ok

  3. Now Crystal Report Gallery window popup after some time 
  4. Now choose "Using the Report Wizard"  and click ok

  5. Now a window will popup and tell you to choose your dataset that we have created in above steps
  6. Choose your Datatable under Customers DataSet and Click ok
  7. Now your Dataset fields will be added on Field Explorer . Field explorer is available on left side of visual studio window
  8. In Field explorer under Database Expert you all datatable fields will be available

  9. you can drag these fields to crystal Report Details Section When you add them in  Details Section Its Header will automatically added to Page Header Section
  10. you can do some design of your Crystal Report like shown below :-


Designing Form

  1. Now  we will add a Aspx form that will be used to view our Crystal Report
  2. Right click on Project Folder in solution Explorer and click on Add then in further sub-menu click on New item 
  3. Now a Popup window appears scroll and choose WebForm give it name and Click on Ok  
  4. Now delete the existing code Add Following Code To Aspx Form


<%@ Register Assembly="CrystalDecisions.Web, Version=13.0.2000.0, Culture=neutral, PublicKeyToken=692fbea5521e1304"
    Namespace="CrystalDecisions.Web" TagPrefix="CR" %>

<!DOCTYPE html PUBLIC "-//W3C//DTD XHTML 1.0 Transitional//EN" "http://www.w3.org/TR/xhtml1/DTD/xhtml1-transitional.dtd">
<html xmlns="http://www.w3.org/1999/xhtml">
<head runat="server">
    <title></title>
</head>
<body>
    <form id="form1" runat="server">
        <center>
    <CR:CrystalReportViewer ID="CrystalReportViewer1" runat="server" AutoDataBind="true" Width="1000" />
            </center>
    </form>
</body>
</html>


Adding Csharp ( C# ) Code


  1. Now go to Csharp code of New Added Webform and Add code similar to code below :-
  2. Add this code under your partial class -- 


protected void Page_Load(object sender, EventArgs e)
    {
        ReportDocument crystalReport = new ReportDocument();
        crystalReport.Load(Server.MapPath("~/CustomerReport.rpt"));
        Customers dsCustomers = GetData("select * from Testtable");
        crystalReport.SetDataSource(dsCustomers);
        CrystalReportViewer1.ReportSource = crystalReport;
    }

    private Customers GetData(string query)
    {
        string conString = ConfigurationManager.ConnectionStrings["constr"].ConnectionString;
        SqlCommand cmd = new SqlCommand(query);
        using (SqlConnection con = new SqlConnection(conString))
        {
            using (SqlDataAdapter sda = new SqlDataAdapter())
            {
                cmd.Connection = con;

                sda.SelectCommand = cmd;
                using (Customers dsCustomers = new Customers())
                {
                    sda.Fill(dsCustomers, "DataTable1");
                    return dsCustomers;
                }
            }
        }
    }

Tuesday 18 March 2014

Implementing Search Functionality in ASP.NET MVC 4

What we are Going To cover


* In this Tutrial we are going to cover how to implement search functionality in Asp.Net MVC 4 . In our web applications in MVC we often need to add the functionality to search the database objects for specific data based on some creteria like to find employees with name starting with 'N' or to find data of employees that have Gender Male

Download Demo App With Database Link Below

Creating Database For This Application

1. First create Database

* Open Microsoft Sql server . Click on New Query . Now execute the query below to create database

Create Database searchingInmvc

Implementing Search Functionality in ASP.NET MVC 4
Create Database Searching in Asp.net MVC 4

2. Then Press F5 . This will create Database successfully

Create Table And Inserting Demo Data


create table tblEmployee         //creating table
(
ID int identity primary key,
Name nvarchar(50),
Gender nvarchar(50),
Email nvarchar(50)
)
Implementing Search Functionality in ASP.NET MVC 4
Creating Table In database 

//Inserting Demo Data

Here , we are inserting 4  Rows in Database table

insert into tblEmployee values('John','Female','john@geeksprogrammings.blogspot.in')
insert into tblEmployee values('funky','Male','funky@geeksprogrammings.blogspot.in')
insert into tblEmployee values('wiley','Male','wiley@geeksprogrammings.blogspot.in')
insert into tblEmployee values('ceren','Female','ceren@geeksprogrammings.blogspot.in')

Implementing Search Functionality in ASP.NET MVC 4
Inserting Data in Table 

Showing All Inserted Data

Download Database script file

In link below you can download the script file and then double click on file it will open in sql server . It will create the database automatically for you when you execute it

Create New MVC 4 Application in Visual Studio

1. Start Visual Studio with language selected as C#
2.Click on File --> Then click on New Project
3. Scroll down and select ASP.NET MVC 4 Web Application

Implementing Search Functionality in ASP.NET MVC 4
Implementing Search Functionality in Asp.Net MVC 4


4. Give appropriate Name,Path and solution Name and Hit Enter
5. choose Empty Template
6. Choose Razor View Engine and Hit Enter
7. Now New MVC 4 web application is started

Adding Models to MVC 4 Application

1. In solution Explorer -- > Right click on Models --> Then click on New item

Implementing Search Functionality in ASP.NET MVC 4

2. Then select ADO.NET Entity Data Model --.> Give it a valid name like 'sampledatamodel'
3. Click Add

Implementing Search Functionality in ASP.NET MVC 4
Implementing Search Functionality in Asp.Net MVC 4

4. Now A dialog box appears choose database connection to sql server and give your connection string a name that will be give to connection string in web.config file

Implementing Search Functionality in ASP.NET MVC 4
Implementing Search Functionality in Asp.Net MVC 4

5. click next
6. Now in next dialog box you will be presented with tables available in database table select you table

Implementing Search Functionality in ASP.NET MVC 4
Implementing Search Functionality in Asp.Net MVC 4

7. Now click Finish
8. Now Entity model of table is generated you can rename your database here to 'Employee'

Implementing Search Functionality in ASP.NET MVC 4
Implementing Search Functionality in Asp.Net MVC 4

9. Now Model is successfully Added

Adding Controller and Views To MVC 4 Application

To add controller to database --

1. Right click on Controllers folder in solution folder
2. click on Add --> Then click on Controller

Implementing Search Functionality in ASP.NET MVC 4
Implementing Search Functionality in Asp.Net MVC 4

3. Now Add controller Dialog Box appears
4. Give your controller a name like 'HomeController'
5. In template choose  'MVC controller with read/write and views using Entity  Framework'
6. The Reason behind choosing this is it will automatically generate some pages to insert,delete , update data of model to which we are associating this controller
7. Now give the Model name that we have added in previous step 'Employee'
8. Now Choose dbcontext class from dropdown menu and finally  click ADD
9. This autimatically add Views for insert , update, delete and index view in views folder under controller named folder

Implementing Search Functionality in ASP.NET MVC 4
Implementing Search Functionality in Asp.Net MVC 4

 10. Now Run your application . This will give output below:-

Implementing Search Functionality in ASP.NET MVC 4
Implementing Search Functionality in Asp.Net MVC 4

Adding Style And Look To Application

So we are going to search the database and retrieve data from database and then show the retrieved result to user. For this we have to get some controls and code . The GUI design that are going to give to this application is as below :-

1. In solution Explorer under Index view Double click on Index.cshtml
2. Now just before the line '<h2>Index</h2>' add a line 

<div style='font-family:Arial'>
and close this div right below the code after table tag 

Other UpdationAre in Demo Project Downlao And Use it

3. Update your Index.cshtml file under view folder in solution Explorer with the code below

@model IEnumerable<SearchInMVC.Models.Employee>
@{
    ViewBag.Title = "Index";
}
<div style="font-family:Arial ">
<h2>Index</h2>

<p>
    @Html.ActionLink("Create New", "Create")
</p>
<p>
@using (Html.BeginForm ("Index","Home",FormMethod.Get ))
{
<b>Search by:</b>@Html.RadioButton("searchBy","Name")<text> Name</text>
@Html.RadioButton("searchBy","Gender")<text>Gender</text><br />
@Html.TextBox("Search");<input type="submit" value="Search" />
    }
</p>
<table border="1">
    <tr>
        <th>
            @Html.DisplayNameFor(model => model.Name)
        </th>
        <th>
            @Html.DisplayNameFor(model => model.Gender)
        </th>
        <th>
            @Html.DisplayNameFor(model => model.Email)
        </th>
        <th>Action</th>
    </tr>
    @if (Model.Count() == 0)
    {
        <tr>
        <td colspan ="4">No Rows Match Search Criteria</td>
        
        </tr>
    }
    else
    {
foreach (var item in Model)
{
    <tr>
        <td>
            @Html.DisplayFor(modelItem => item.Name)
        </td>
        <td>
            @Html.DisplayFor(modelItem => item.Gender)
        </td>
        <td>
            @Html.DisplayFor(modelItem => item.Email)
        </td>
        <td>
            @Html.ActionLink("Edit", "Edit", new { id = item.ID }) |
            @Html.ActionLink("Details", "Details", new { id = item.ID }) |
            @Html.ActionLink("Delete", "Delete", new { id = item.ID })
        </td>
    </tr>
}
    }
</table>
</div>


Now Run your Application and you can see the change with output below :-

Implementing Search Functionality in ASP.NET MVC 4
Implementing Search Functionality in Asp.Net MVC 4

Code Description

In code above we have used Razor code and instead of using <form> tag that we usually use in html we have used Html Helper below


@using (Html.BeginForm ("Index","Home",FormMethod.Get ))
{
<b>Search by:</b>@Html.RadioButton("searchBy","Name")<text> Name</text>
@Html.RadioButton("searchBy","Gender")<text>Gender</text><br />
@Html.TextBox("Search");<input type="submit" value="Search" />
    }


In Html.BeginForm ("Index","Home",FormMethod.Get )

Here, Html.BeginForm  is used in place of using form tag . Html.BeginForm  Received 3 arguments .
Here, "Index" is Name of action that will be executed on posting form  to server
Here, "Home" is name of controller to which this link will be redirected when clicked
Here, " FormMethod.Get" type of encoding method that applied on data we are posting 

Now Open Controller And Add code below to Index Action of home controller

 if (searchby == "Gender")
            {
                return View(db.Employees.Where(x => x.Gender == search || search ==null).ToList());
            }
            else
            {
                return View(db.Employees.Where(x => x.Name.StartsWith(search)).ToList());
}


Thursday 12 May 2016

Create News Feed In PHP


Code To Create A Simple News Feed In PHP


Use Ajax & Jquery To Fetch & Populate News Feed . Make Ajax Call From Page Control Will go to specified PHP page through ajax call then fetch data in that PHP page and send data to callback to Ajax Call

See A simple Example below :-

HTML PAGE CODE

<html>
<head>
//Required CSS  / JSS Files
</head>
<body>
<div id="news"></div>
//Click Button Below To Fetch News Feeds
<input type="button" onclick="GetNews()" value="Get News Feed" />
<script>
    function GetNews()
    {
        $("#news").load("path_to/AjaxFetchData.php")
    }
</script>
</body>
</html>


AjaxFetchData.php File Code


//Sql Query To Fetch News Feed From Database
$con= Initialize it with connection Details for database
$sql = "Select Top 50 from TblNews";
$result = $result=mysqli_query($con,$sql);
while($row =  $result->fetch_assoc())
{
    echo("<div class='NewsFeed'>");
    echo("<div class='title'>" . $row['title'] . "</div>");
    echo("<div class='body'>" . $row['body'] . "</div>");
    echo("</div>");


}

Thursday 20 August 2015

Difference Between Views And StoredProcedure Sql

Stored Procedure Vs Views


1. Stored Procedure are collection of pre-executed sql Statements that accepts parameters as input and depending on input parameters passed gives the Output Result

Views Act like Virtual Tables That Contains set of Rows and Columns from multiple original table of Database according to defined Query Commands

2. Stored Procedure Cannot be Used as Large Building Block or we can simply say It cannot be treated as tables in large queries 

But Views Can be treated like tables we can Use Views similar to table and execute select statements on Views Similar to Tables

3. Stored Procedures Allow the Use of Data Manipulation Command like Insert Data , Update data on Table or Schemas To Manipulate Data

But Views Cannot have Data Manipulation Command It can only give list of data or View of data based on set of Queries in it . Views cannot be used to Permanently store data in database it allows just to view the data.

4. Views  can have  only one Select Statement Allowed To Use

Store Procedure Can Use Various Set of Statements That also Include If-Else Statements

5. View is a virtual table that only exists when you use the view in a query. Its considered virtual table because it acts like a table, and the same operations that can be performed on a table can be performed on a view. Virtual table doesn't stay in the database, it gets created when we use the view and then delete it. 

But Stored Procedure Physically Exist 

6. Views are Used for Providing Security to data So that by using the Views we can View only Particular view of the schema to the user Not the Full View with required columns. Their is no physical presence of view data anywhere in database.

Stored Procedure allows to perform any type of data Manipulation operation But We can also Put Security Permission on Store Procedure In order to Restrict its Access From Unauthorized User


7. Code Sample For Stored Procedure and Views
/*
This Stored procedure is used to Insert value into the table tbl_students. 
*/

Create Procedure InsertStudentrecord
(
 @StudentFirstName Varchar(200),
 @StudentLastName  Varchar(200),
 @StudentEmail     Varchar(50)
) 
As
 Begin
   Insert into tbl_Students (Firstname, lastname, Email)
   Values(@StudentFirstName, @StudentLastName,@StudentEmail)
 End
 
 
/*
View Example
*/
CREATE VIEW [Category Sales For 1997] AS

SELECT DISTINCT CategoryName,Sum(ProductSales) AS CategorySales

FROM [Product Sales for 1997]

GROUP BY CategoryName