Showing posts with label asp.net. Show all posts

Wednesday 20 July 2016

Installing Asp.net Core


Steps To Install Asp.net Core


Step 1. Before Installing Asp.net Core Let Fulfill Its Prerequisites As Below -

First you need to Install Visual Studio 2015 . You Can Download Free Visual Studio Community Edition From Link below -
Download Visual Studio 2015

For Mac & Linux Users You Can Use Visual Studio Code -
Download Visual Studio Code & Read Its All Details 

Step 2. After Download & Installing Visual Studio 2015 you need to make sure you have Visual Studio 2015 Update 3 Installed . You Can Download Visual Studio 2015 Update 3 From Link Below -
Download Visual Studio 2015 Update 3

Real ALL Details About Visual Studio 2015 Update 3 Here -
What's New Added in Visual Studio Update 3

Step 3 -  Please Check Out All Dependencies of Asp.net Core Before Installing it . See All Dependencies of Asp.net Core For All OS -
Dependencies of Asp.net Core

Step 4 - Now Download & Install Asp.net Core From link below -
Download Asp.net Core

Step 5 - Now Asp.net Core is Setup Head Towards Next Post To Make First Sample App in Asp.net Core To Make Ensure its setup Correctly . Link TO Next Post is Below - 

Friday 3 June 2016

Difference Between MVC and webforms


The main advantages of The Official Microsoft ASP.NET Site MVC are:
  • Enables the full control over the rendered HTML.
  • Provides clean separation of concerns(SoC).
  • Enables Test Driven Development (TDD).
  • Easy integration with JavaScript frameworks.
  • Following the design of stateless nature of the web.
  • RESTful urls that enables SEO.
  • No ViewState and PostBack events
  • SEO friendly URL by design
  • No ViewState (this may seem a bit of moving backward to some), but overall a good design
    decision
  • Clean View Markup (no additional HTML emitted)
  • 100% extensible. You can add your own controller with IOC, switch view engines at will, control model binding at wish etc
  • Rich UI support (possible through client side JS libraries like jQuery UI and others)
  • Pluggable architecture
  • Out of the box minimal IOC support
  • Out of the box support for mitigating antiforgery attacks and XSS vulnerability
  • MVC is Faster by default because of lack of viewstate and clean markup. But performance is subject and MVC by design is more performant that traditional The Official Microsoft AspDotNet webforms
Limitation of MVC 
  • There is little Bit Long Learning Curve as compared to Asp.Net webforms 
The main advantage of Aspdotnet Web Form are:
  • It provides RAD development
  • Easy development model for developers those coming from winform development.

Difference Between MVC and webforms

Friday 1 May 2015

Using Report Viewer with Dataset Asp.net Csharp and vb


For Using Report Viewer in Asp.net or Desktop Application using Csharp or Visual basic I am today providing a simple step by step solution -

Demo File is also available to Download so that you can have a demo for how to use or Use Reports With Dataset in Asp.net . I have provided Both Csharp and Vb code

Step 1 - First of Start a C# Project or Vb Project and then Add an Empty Webform to it .


Step 2 :- Now Right Click on Solution in Solution Explorer and Click on Add then click on New Item . Then Click On DataSet and Give a Name and Click Ok . This will add a Dataset in your Project . I will recommend it give dataset a name similar to database table whose data you want to show in Report Viewer

Using Report Viewer with Dataset Asp.net Csharp and vb , Using Reporting in asp .net dotnet


Step 3 :- Now After Dataset is added Right Click on Dataset Page and Click on Add then click on DataTable It will add a DataTable

Using Report Viewer with Dataset Asp.net Csharp and vb , Using Reporting in asp .net dotnet


Step 4:- Now Add Columns to DataTable and Must Ensure that the name of these DataTable column must be same to Names of Columns in Database that Corresponds to this DataTable

Using Report Viewer with Dataset Asp.net Csharp and vb , Using Reporting in asp .net dotnet

Step 5 :- Now Again Right click on solution in Solution Explorer and Click on Add then click on New and then click on Report give it a name and click on ok . This will add a Report to your Project

Using Report Viewer with Dataset Asp.net Csharp and vb , Using Reporting in asp .net dotnet

Step 6 :- Now From You Controls Toolbox in Visual Studio . Place a Report Viewer Control on your WebPage as shown in image below


Using Report Viewer with Dataset Asp.net Csharp and vb , Using Reporting in asp .net dotnet


 Step 7 :- Now Open your Recently Added Report file you will see it same as shown below


Using Report Viewer with Dataset Asp.net Csharp and vb , Using Reporting in asp .net dotnet


Step 8 :- Now we need to Add the Previously added dataset or need to link the dataset we added in previous steps to the report file

Step 9 :- So for that linking Right Click on Dataaset folder in sidebar of Report Then Click on Add Dataset then you will see the following screen

Step 10 :- Now select the Added Dataset from Combox for DataSource and then after that Choose the DataTable from Next Last Combobox
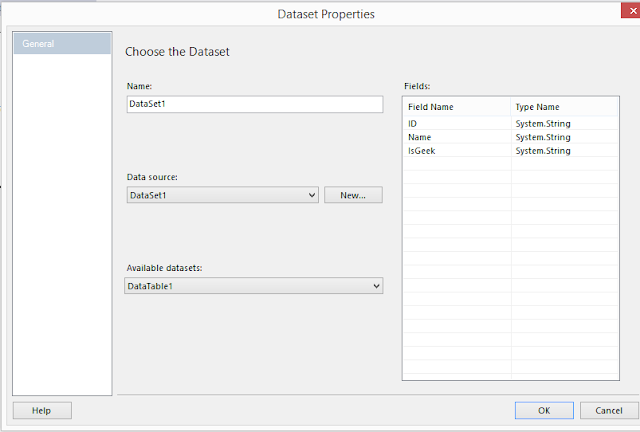

Using Report Viewer with Dataset Asp.net Csharp and vb , Using Reporting in asp .net dotnet

Step 11  :- Now Dataset Fields will be added Under Dataset folder in Left Sidebar of Report . Now you can Drag drop fields from Left Sidebar and also Place the Textbox for Labelling like I have added for ID,Name and heading etc


Using Report Viewer with Dataset Asp.net Csharp and vb , Using Reporting in asp .net dotnet

Step 13:-  Now we need to Add the Code so Open Cshar Code side of Webpage where you have added the Report viewer control And Add the following code according to your choose language c# or vb

Now At Page_Load Event of your WebPage Add the Following Code According to C# or VB


Imports System.Data
Imports System.Data.SqlClient
Imports Microsoft.Reporting.WebForms

        'VB CODE
        ReportViewer1.ProcessingMode = Microsoft.Reporting.WebForms.ProcessingMode.Local
        ReportViewer1.LocalReport.ReportPath = Server.MapPath("~/Report.rdlc")

        Dim dsUsersInfo As New DataSet1
        Dim con As New SqlConnection("Your Connection String")
        Dim cmd As New SqlCommand("select * from YourTableName", con)
        Dim da As New SqlDataAdapter()
        da.SelectCommand = cmd

        'DataTable1 is the DataTable we have created in Dataset1 that contains our columns
        da.Fill(dsUsersInfo, "DataTable1")


        Dim datasource As New ReportDataSource("DataSet1", dsUsersInfo)
        ReportViewer1.LocalReport.DataSources.Clear()
        ReportViewer1.LocalReport.DataSources.Add(datasource)


        'CSharp Code
        'ReportViewer1.ProcessingMode = Microsoft.Reporting.WebForms.ProcessingMode.Local
        'ReportViewer1.LocalReport.ReportPath = Server.MapPath("~/Report.rdlc")

        ' DataSet1 dsUsersInfo = new DataSet1();

        '        SqlConnection con = new SqlConnection("Your Connection String"));

        '            con.Open();
        '            SqlCommand cmd1 = new SqlCommand("select * from TableName", con);

        '            SqlDataAdapter da = new SqlDataAdapter(cmd1);
        '            da.Fill(dsUsersInfo, "DataTable1");
        '            con.Close();

        '        ReportDataSource datasource = new ReportDataSource("DataSet1", dsUsersInfo.Tables[0]);

        'ReportViewer1.LocalReport.DataSources.Clear()
        'ReportViewer1.LocalReport.DataSources.Add(datasource)


Step 12 :- Now when you run the Page where you have added the Report viewer control It will show the Report with data from database


Wednesday 11 February 2015

HTTP Error 500-22 - Internal Server Error The page cannot be displayed because an internal server error has occurred


Now At 11:47 PM I am going to write about how to solve HTTP 500.22 - Internal Server Error . This error is really very Bad Boy . It only display Error Message and does not give any detailed information about error as we don't normally allow for that . So Now I am going to give information how today Solved this error and what will be sure short and easy steps to solve this error so that you save your time .

I First tried to set CustomErrors="Off" in web.congig file just after <system.web> tag start But it does not helped so first i need to find way to see the error . So only way to see the error is through log file . I was using azure so I decided to turn on azure logging to check what is error

Enable Logging In Microsoft Azure Portal -


- Enable Application Diagnostics Logging 


1. Login to Azure Portal . In sidebar click on websites . Click on desired website
2. Now click on configure In Top Menu and scroll down and find 'Application Diagnostics'
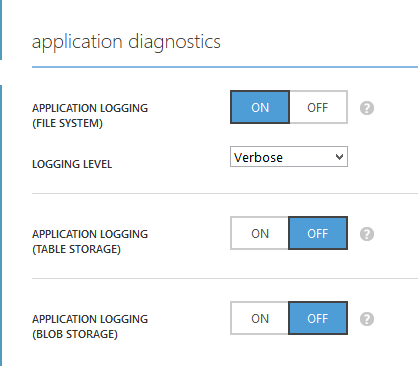
3. Once found Do configuration as shown below -

Application Diagnostics For Application Logging - Windows Azure

- Enable Web Server Logging 


1. Login to Azure Portal . In sidebar click on websites . Click on desired website
2. Now click on configure In Top Menu and scroll down and find 'Web Server Logging'
3. Once found Do configurations as shown below -

Web Server Logging - Windows Azure

4. After Doing Both Diagnostics Configuration . you must Save and Restart Azure Website .

How To Find Error In Azure Website Log


1. Now after Enabling Log you can see your log by logging in your FTP Client like CuteFTP or      FileZilla( In my case) . First login to your FTP Client of that website

2. Now at root you can see a folder named LogFiles as shown below -

LogFile In windows Azure


3. Open the folder and then find a folder named 'DetailedErrors' Now open the folder here you can 4. see all your errors details for that particular website . as shown below -


Azure Website Log File Detailed Errors


5. So choose the latest file and download it to your computer and open it in browser and It will show you error in your azure website in Detail so that we can know error information to solve the error . In my case error was HTTP Error 500.22 error as shown by log file below snapshot -


Find Error Using Logs in windows Azure


 Cause of  HTTP Error 500-22 - Internal Server Error


The Main cause of  "HTTP Error 500-22 - Internal Server Error  The page cannot be displayed because an internal server error has occurred" is Managed Pipeline Mode in Application Pool . Integrated Pipeline Mode of Application Pool does not support some services and functionalities 

Solution For HTTP Error 500-22 - Internal Server Error  


Step 1- Change Application Pool From Integrated Pipeline Mode To Classic Pipeline Mode


FOR IIS USERS ON Windows Server


1. Open Control Panel Then GoTo Administrative Tools
2. Then choose IIS Manager
3. Now Change  App site's Managed Pipeline from Integrated to Classic.

FOR AZURE PORTAL USERS 


1. Login to your Azure Portal . In sidebar click on websites . Click on desired website
2. Now click on configure In Top Menu and Under General Section find 'Managed Pipeline Mode'
3. Once Found Change mode from Integrated To Classic Pipeline Mode  as shown in snapshot below

Enable Classic Pipeline Mode Application Pool IIS and Windows Azure

Now after this change No other change will be required Everything is solved now . browse your website everything will be fine .

In case you face some Problem or Same Error Persist You may try the following solutions that can help in resolving issue 

 Changes in Web.Config File (Optional )


1. First open your Web.Config file and Search for <Configuration> Tag opening part and then insert following code in it and it should look like below --

<configuration>
    <system.webServer>
        <validation validateIntegratedModeConfiguration="false"/>
    </system.webServer>
</configuration>

Sunday 25 January 2015

Using Entity Framework Code First Migration Asp MVC

 Code First Database Initializers


 Before understanding code first migrations, let's have a look at Code First Database Initializers   provided by Entity Framework. When you follow EF code first approach, then you have three op tions for initializing database as given below–
  1. CreateDatabaseIfNotExists

    This is the default database initializer class used by Code First. This class creates a database only if it doesn't exist. This initializer helps you to avoid any accidental deletion of the database.
  2. DropCreateDatabaseWhenModelChanges

    This database initializer class drop the existing database and re-creates it if there is a mismatch between the model classes and table schema. This initializer is useful during starting phase of development and testing when models are changing often and there is no concern about the existing database records.
  3. DropCreateDatabaseAlways

    This database initializer class always drop and creates a new database, whether it is already present or not with every run of the application. This initializer is useful during testing when you want to run the application with a fresh set of data.

    Why Code First Migrations?

    The above three database initializing approach become fail when you add new model classes and you want to update existing database without any deletion or change. To achieve this, you need to use EF code first migrations which allow you to update existing database with new model classes changes and your existing database remains same with your database records.

    Visual Studio Package Manager Console

    To create the database for these two entities within your application, go to the Package Manager Console option as shown below:

    Creating New Database

    Running Commands

    Run the following command to configure migrations within your project and for creating new database.
  4. Enable migrations

    Enable-Migrations
  5. Create migration

    Add-Migration MigrationsName
  6. Create upgrade/downgrade script

    Update-Database

  7. Updating Existing Database

    Suppose you have added one more class named as Customer into your data model classes as given below:

    Running Commands

    Now for updating the database with new changes run the following commands as given below:
  8. Create migration

    Add-Migration MigrationsName
  9. Create upgrade/downgrade script

    Update-Database


Friday 2 January 2015

Nopcommerce Developer Guide


Internship - Day 1


Today was first day of my internship Period of 6 months . I am very happy to start my internship with Abax Technologies . Abax technologies is a recognized IT company Situated in Noida . It deals with Desktop , web and Mobile application development and providing solutions to market .

Mr. Rohit Jain is CEO of Company and I am doing Internship under their guidance .

Now came to work -- On 2nd January - 8:23 am Rohit Sir posted my first task on skype . My first task was first to learn more about Nopcommerce , Its Architecture , Plugin development , Module Development , Theme development and widget development .

First i need to download the source code for Nopcommerce form Nopcommerce office webiste then using that source code to compile it , set up its database then run a demo site in nopcommerce .

After setup the demo site for nopcommerce it started exploring its source code architecture and learn more about it from its developer's documentation

I have previously done a ecommerce website in Nopcommerce but at that time i used Nopcommerce 1.9 version that was asp.net version of nopcommerce Now i am going to use Nopcommerce 3.2 and this version is really cool . It is MVC version of nopcommerce using Linq queries instead of using sql and using Razor view engines and more flexibility . Actually I liked this version .

Important Links that i have studied and explored today -

Link for Nopcommerce Developer's Documentation
Nopcommerce Developer Documentation


Nopcommerce uses code first approach for each and every development component in nopcommerce so i decided to first give a look at code first approach to revise my concepts about codefirst approach

Code First Approach Documentation MVC


After Reading about code first approach of Nopcommerce I reached a Nerd Dinner app that is MVC app that uses code first approch for MVC application development
Nerd Dinner MVC App with Code First Approach

So that was it for the day i learned number of things today

Today I have explored following Modules -


1. Nopcommerce Installation v3.20 (mvc)
2. Explored Nopcommerce Developers Documentation
3. Exploring Nopcommerce Architecture
4. Explored Nopcommerce Theme CUstomization and Creating Own Theme
5. Exploring Plugin Development Documentation
     -- Created simple hello world Plugin

Next I will explore create plugins with database access and various nopcommerce inbuilt modules

Tuesday 11 November 2014

Benefits of Html Helpers in Asp.Net MVC

So today i am going to give an overview on Html helpers in Asp.Net MVC . So first questions that stuck our mind are -

 What are Html helpers ?
 Why to use them instead of using simple Html coded controls
 What are their benefits in Asp.Net MVC

Html helpers are very much similar to Asp.Net web controls . But Html helpers are much more lightweight as compared to Asp.net Web forms Server controls . The similarity between server controls in Asp.net webforms and Html helpers in Asp.Net MVC are Viewstate . Means they both contain the ability to hold or update the data on postbacks using ViewStates for each controls .

Main  Benefits Of using Html Helpers in Asp.net MVC

  • MVC Html Helpers contains Overloaded Methods like IPostBackDataHandler that Pre-populate the values of html helpers means it works similar to as viewstates
  • Html Helpers is also having one more advantage It provide inbuilt Validation for html helpers textboxes 
Available HTML Helpers 

There following HTML helpers can be used to render (modify and output) HTML form elements:

  1. BeginForm()
  2. EndForm()
  3. TextArea()
  4. TextBox()
  5. CheckBox()
  6. RadioButton()
  7. ListBox()
  8. DropDownList()
  9. Hidden()
  10. Password()

Sample Code To Demonstrate Use of Html Helpers


ASPX CODE

<%= Html.ValidationSummary("Create was unsuccessful. Please correct the errors and try again.") %>
<% using (Html.BeginForm()){%>
<p>
<label for="FullName">FullName</label>
<%= Html.TextBox("FullName") %>
<%= Html.ValidationMessage("FullName", "*") %>
</p>
<p>
<label for="Username">Username</label>
<%= Html.TextBox("Username") %>
<%= Html.ValidationMessage("Username", "*") %>
</p>
<p>
<label for="Password">Password:</label>
<%= Html.Password("Password") %>
<%= Html.ValidationMessage("Password", "*") %>
</p>
<p>
<label for="Password">Confirm Password:</label>
<%= Html.Password("ConfirmPassword") %>
<%= Html.ValidationMessage("ConfirmPassword", "*") %>
</p>
<p>
<%= Html.CheckBox("ReceiveNewsletter") %>
<label for="ReceiveNewsletter" style="display:inline">Receive Newsletter?</label>
</p>
<p>
<input type="submit" value="Register" />
</p>
<%}%>

RAZOR CODE

@Html.ValidationSummary("Create was unsuccessful. Please correct the errors and try again.")
@using (Html.BeginForm()){ 
<p>
<label for="FullName">FullName</label>
@Html.TextBox("FullName")  
@Html.ValidationMessage("FullName", "*")  
</p>
<p>
<label for="Username">Username</label>
@Html.TextBox("Username")  
@Html.ValidationMessage("Username", "*")  
</p>
<p>
<label for="Password">Password:</label>
@Html.Password("Password")  
@Html.ValidationMessage("Password", "*")  
</p>
<p>
<label for="Password">Confirm Password:</label>
@Html.Password("ConfirmPassword")  
@Html.ValidationMessage("ConfirmPassword", "*")  
</p>
<p>
@Html.CheckBox("ReceiveNewsletter")  
<label for="ReceiveNewsletter" style="display:inline">Receive Newsletter?</label>
</p>
<p>
<input type="submit" value="Register" />
</p>