Showing posts sorted by relevance for query .net. Sort by date Show all posts

Friday 1 May 2015

Using Report Viewer with Dataset Asp.net Csharp and vb


For Using Report Viewer in Asp.net or Desktop Application using Csharp or Visual basic I am today providing a simple step by step solution -

Demo File is also available to Download so that you can have a demo for how to use or Use Reports With Dataset in Asp.net . I have provided Both Csharp and Vb code

Step 1 - First of Start a C# Project or Vb Project and then Add an Empty Webform to it .


Step 2 :- Now Right Click on Solution in Solution Explorer and Click on Add then click on New Item . Then Click On DataSet and Give a Name and Click Ok . This will add a Dataset in your Project . I will recommend it give dataset a name similar to database table whose data you want to show in Report Viewer

Using Report Viewer with Dataset Asp.net Csharp and vb , Using Reporting in asp .net dotnet


Step 3 :- Now After Dataset is added Right Click on Dataset Page and Click on Add then click on DataTable It will add a DataTable

Using Report Viewer with Dataset Asp.net Csharp and vb , Using Reporting in asp .net dotnet


Step 4:- Now Add Columns to DataTable and Must Ensure that the name of these DataTable column must be same to Names of Columns in Database that Corresponds to this DataTable

Using Report Viewer with Dataset Asp.net Csharp and vb , Using Reporting in asp .net dotnet

Step 5 :- Now Again Right click on solution in Solution Explorer and Click on Add then click on New and then click on Report give it a name and click on ok . This will add a Report to your Project

Using Report Viewer with Dataset Asp.net Csharp and vb , Using Reporting in asp .net dotnet

Step 6 :- Now From You Controls Toolbox in Visual Studio . Place a Report Viewer Control on your WebPage as shown in image below


Using Report Viewer with Dataset Asp.net Csharp and vb , Using Reporting in asp .net dotnet


 Step 7 :- Now Open your Recently Added Report file you will see it same as shown below


Using Report Viewer with Dataset Asp.net Csharp and vb , Using Reporting in asp .net dotnet


Step 8 :- Now we need to Add the Previously added dataset or need to link the dataset we added in previous steps to the report file

Step 9 :- So for that linking Right Click on Dataaset folder in sidebar of Report Then Click on Add Dataset then you will see the following screen

Step 10 :- Now select the Added Dataset from Combox for DataSource and then after that Choose the DataTable from Next Last Combobox
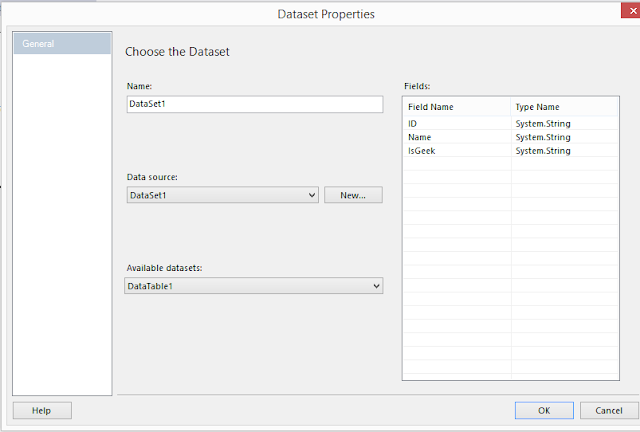

Using Report Viewer with Dataset Asp.net Csharp and vb , Using Reporting in asp .net dotnet

Step 11  :- Now Dataset Fields will be added Under Dataset folder in Left Sidebar of Report . Now you can Drag drop fields from Left Sidebar and also Place the Textbox for Labelling like I have added for ID,Name and heading etc


Using Report Viewer with Dataset Asp.net Csharp and vb , Using Reporting in asp .net dotnet

Step 13:-  Now we need to Add the Code so Open Cshar Code side of Webpage where you have added the Report viewer control And Add the following code according to your choose language c# or vb

Now At Page_Load Event of your WebPage Add the Following Code According to C# or VB


Imports System.Data
Imports System.Data.SqlClient
Imports Microsoft.Reporting.WebForms

        'VB CODE
        ReportViewer1.ProcessingMode = Microsoft.Reporting.WebForms.ProcessingMode.Local
        ReportViewer1.LocalReport.ReportPath = Server.MapPath("~/Report.rdlc")

        Dim dsUsersInfo As New DataSet1
        Dim con As New SqlConnection("Your Connection String")
        Dim cmd As New SqlCommand("select * from YourTableName", con)
        Dim da As New SqlDataAdapter()
        da.SelectCommand = cmd

        'DataTable1 is the DataTable we have created in Dataset1 that contains our columns
        da.Fill(dsUsersInfo, "DataTable1")


        Dim datasource As New ReportDataSource("DataSet1", dsUsersInfo)
        ReportViewer1.LocalReport.DataSources.Clear()
        ReportViewer1.LocalReport.DataSources.Add(datasource)


        'CSharp Code
        'ReportViewer1.ProcessingMode = Microsoft.Reporting.WebForms.ProcessingMode.Local
        'ReportViewer1.LocalReport.ReportPath = Server.MapPath("~/Report.rdlc")

        ' DataSet1 dsUsersInfo = new DataSet1();

        '        SqlConnection con = new SqlConnection("Your Connection String"));

        '            con.Open();
        '            SqlCommand cmd1 = new SqlCommand("select * from TableName", con);

        '            SqlDataAdapter da = new SqlDataAdapter(cmd1);
        '            da.Fill(dsUsersInfo, "DataTable1");
        '            con.Close();

        '        ReportDataSource datasource = new ReportDataSource("DataSet1", dsUsersInfo.Tables[0]);

        'ReportViewer1.LocalReport.DataSources.Clear()
        'ReportViewer1.LocalReport.DataSources.Add(datasource)


Step 12 :- Now when you run the Page where you have added the Report viewer control It will show the Report with data from database


Tuesday 11 November 2014

Advantage of Asp.Net MVC

Asp.net  is a part of .net platform for creating,building, deploying and running web applications using C#,VB etc .we can develop a web application by using Asp.Net Web Form and Asp.Net MVC. Asp.Net MVC is advanced technology that is most widely used nowadays . MVC is a great thing available for developers that makes work of developers easy and more flexible .

MVC stands for Model-View-Controller . MVC separates the code in 3 different things that make the code cleaner , flexible and easy to understand and modify . So Today I am going to tell some of big advantages or some good things that Asp.Net MVC provides as compared to Web-forms . This is not a comparison of Web-forms and MVC this is just overview or advantages or features that Asp.Net mvc provides us

1. Rapid Application Development ( RAD ) :- So first I will start with biggest advantage of Asp.net Mvc and this is the thing that is most in demand in Enterprises and everywhere in development area . This is Rapid application development . Asp.Net MVC provides Database First Approach for developing WebApplications . This approach is used with Scanfolding Technique this technique is like a magic provided in Asp.Net MVC . Scanfolding technique tells if you have designed your database in good manner that means if you have Created Normalized Database with all like Primary keys, foreign keys ,One-many , many-many relationships then you need not to do more effort for developing rest on your application in Asp.Net MVC Rest of things will be created with less efforts using scanfolding . With Asp.Net MVC you can have your simple basic website ready within 1 minute after you created your Database . So that was explanation to RAD in Asp.Net MVC

In Pic below we are choosing MVC5 scanfolding template


Then it automatically generate code for us


2. Partial Layouts :- In Asp.Net we ofter use User controls that were used for code reusability we create a user control then where we require that type of code that we coded in user control we call that user control there . In similar way Partial Layouts is provided in Asp.Net MVC .Partial Layouts are very useful things provided in Asp.Net MVC . Partial Layouts are like Master Pages that we use in Asp.Net web-forms . These are used as master pages or master layouts that can be called in any view in Asp.Net MVC . Like in php we use include ( "partialheader.php" ); to include some header in all pages or some specific pages so instead of writting that code in all pages we call then there . Similar in Asp.Net Web-Forms We use content placeholders and contentplaceholders are placed in Master Pages and when we call these master pages and use then in child forms then code of child forms is placed in content placeholder area In the similar way Partial layout works . The partial layout contains @Renderbody in Razor view then replace the child page or code of  page that is calling it

3. MVC Is  Stateless : Asp.Net was Statefull by using viewstates or sessions but Asp.net MVC is stateless . It will be wrong to say mvc is stateless it would say http is stateless . By stateless i mean there is nothing in http that holds the user session or that record the activity of user when user logged in etc so this was maintained or state was maintained using viewstate and sessions . This was used in asp.net Webforms because they contain server controls that contains viewstate and that postback the values and update viewstates But there is not server controls in Asp.Net MVC So it does not maintain states . It has divided the code in three patterns model-view-controller that handles everything That's why it says MVC is stateless But in actual http is stateless that why MVC is stateless

4. No Events : As we came to know there are no server controls in Asp.Net MVC so there are no events for any control as there are not server controls All this is handled by connection of controllers with views where views hold your html code or designing code and controller hold your logics code .


Tuesday 18 March 2014

Implementing Search Functionality in ASP.NET MVC 4

What we are Going To cover


* In this Tutrial we are going to cover how to implement search functionality in Asp.Net MVC 4 . In our web applications in MVC we often need to add the functionality to search the database objects for specific data based on some creteria like to find employees with name starting with 'N' or to find data of employees that have Gender Male

Download Demo App With Database Link Below

Creating Database For This Application

1. First create Database

* Open Microsoft Sql server . Click on New Query . Now execute the query below to create database

Create Database searchingInmvc

Implementing Search Functionality in ASP.NET MVC 4
Create Database Searching in Asp.net MVC 4

2. Then Press F5 . This will create Database successfully

Create Table And Inserting Demo Data


create table tblEmployee         //creating table
(
ID int identity primary key,
Name nvarchar(50),
Gender nvarchar(50),
Email nvarchar(50)
)
Implementing Search Functionality in ASP.NET MVC 4
Creating Table In database 

//Inserting Demo Data

Here , we are inserting 4  Rows in Database table

insert into tblEmployee values('John','Female','john@geeksprogrammings.blogspot.in')
insert into tblEmployee values('funky','Male','funky@geeksprogrammings.blogspot.in')
insert into tblEmployee values('wiley','Male','wiley@geeksprogrammings.blogspot.in')
insert into tblEmployee values('ceren','Female','ceren@geeksprogrammings.blogspot.in')

Implementing Search Functionality in ASP.NET MVC 4
Inserting Data in Table 

Showing All Inserted Data

Download Database script file

In link below you can download the script file and then double click on file it will open in sql server . It will create the database automatically for you when you execute it

Create New MVC 4 Application in Visual Studio

1. Start Visual Studio with language selected as C#
2.Click on File --> Then click on New Project
3. Scroll down and select ASP.NET MVC 4 Web Application

Implementing Search Functionality in ASP.NET MVC 4
Implementing Search Functionality in Asp.Net MVC 4


4. Give appropriate Name,Path and solution Name and Hit Enter
5. choose Empty Template
6. Choose Razor View Engine and Hit Enter
7. Now New MVC 4 web application is started

Adding Models to MVC 4 Application

1. In solution Explorer -- > Right click on Models --> Then click on New item

Implementing Search Functionality in ASP.NET MVC 4

2. Then select ADO.NET Entity Data Model --.> Give it a valid name like 'sampledatamodel'
3. Click Add

Implementing Search Functionality in ASP.NET MVC 4
Implementing Search Functionality in Asp.Net MVC 4

4. Now A dialog box appears choose database connection to sql server and give your connection string a name that will be give to connection string in web.config file

Implementing Search Functionality in ASP.NET MVC 4
Implementing Search Functionality in Asp.Net MVC 4

5. click next
6. Now in next dialog box you will be presented with tables available in database table select you table

Implementing Search Functionality in ASP.NET MVC 4
Implementing Search Functionality in Asp.Net MVC 4

7. Now click Finish
8. Now Entity model of table is generated you can rename your database here to 'Employee'

Implementing Search Functionality in ASP.NET MVC 4
Implementing Search Functionality in Asp.Net MVC 4

9. Now Model is successfully Added

Adding Controller and Views To MVC 4 Application

To add controller to database --

1. Right click on Controllers folder in solution folder
2. click on Add --> Then click on Controller

Implementing Search Functionality in ASP.NET MVC 4
Implementing Search Functionality in Asp.Net MVC 4

3. Now Add controller Dialog Box appears
4. Give your controller a name like 'HomeController'
5. In template choose  'MVC controller with read/write and views using Entity  Framework'
6. The Reason behind choosing this is it will automatically generate some pages to insert,delete , update data of model to which we are associating this controller
7. Now give the Model name that we have added in previous step 'Employee'
8. Now Choose dbcontext class from dropdown menu and finally  click ADD
9. This autimatically add Views for insert , update, delete and index view in views folder under controller named folder

Implementing Search Functionality in ASP.NET MVC 4
Implementing Search Functionality in Asp.Net MVC 4

 10. Now Run your application . This will give output below:-

Implementing Search Functionality in ASP.NET MVC 4
Implementing Search Functionality in Asp.Net MVC 4

Adding Style And Look To Application

So we are going to search the database and retrieve data from database and then show the retrieved result to user. For this we have to get some controls and code . The GUI design that are going to give to this application is as below :-

1. In solution Explorer under Index view Double click on Index.cshtml
2. Now just before the line '<h2>Index</h2>' add a line 

<div style='font-family:Arial'>
and close this div right below the code after table tag 

Other UpdationAre in Demo Project Downlao And Use it

3. Update your Index.cshtml file under view folder in solution Explorer with the code below

@model IEnumerable<SearchInMVC.Models.Employee>
@{
    ViewBag.Title = "Index";
}
<div style="font-family:Arial ">
<h2>Index</h2>

<p>
    @Html.ActionLink("Create New", "Create")
</p>
<p>
@using (Html.BeginForm ("Index","Home",FormMethod.Get ))
{
<b>Search by:</b>@Html.RadioButton("searchBy","Name")<text> Name</text>
@Html.RadioButton("searchBy","Gender")<text>Gender</text><br />
@Html.TextBox("Search");<input type="submit" value="Search" />
    }
</p>
<table border="1">
    <tr>
        <th>
            @Html.DisplayNameFor(model => model.Name)
        </th>
        <th>
            @Html.DisplayNameFor(model => model.Gender)
        </th>
        <th>
            @Html.DisplayNameFor(model => model.Email)
        </th>
        <th>Action</th>
    </tr>
    @if (Model.Count() == 0)
    {
        <tr>
        <td colspan ="4">No Rows Match Search Criteria</td>
        
        </tr>
    }
    else
    {
foreach (var item in Model)
{
    <tr>
        <td>
            @Html.DisplayFor(modelItem => item.Name)
        </td>
        <td>
            @Html.DisplayFor(modelItem => item.Gender)
        </td>
        <td>
            @Html.DisplayFor(modelItem => item.Email)
        </td>
        <td>
            @Html.ActionLink("Edit", "Edit", new { id = item.ID }) |
            @Html.ActionLink("Details", "Details", new { id = item.ID }) |
            @Html.ActionLink("Delete", "Delete", new { id = item.ID })
        </td>
    </tr>
}
    }
</table>
</div>


Now Run your Application and you can see the change with output below :-

Implementing Search Functionality in ASP.NET MVC 4
Implementing Search Functionality in Asp.Net MVC 4

Code Description

In code above we have used Razor code and instead of using <form> tag that we usually use in html we have used Html Helper below


@using (Html.BeginForm ("Index","Home",FormMethod.Get ))
{
<b>Search by:</b>@Html.RadioButton("searchBy","Name")<text> Name</text>
@Html.RadioButton("searchBy","Gender")<text>Gender</text><br />
@Html.TextBox("Search");<input type="submit" value="Search" />
    }


In Html.BeginForm ("Index","Home",FormMethod.Get )

Here, Html.BeginForm  is used in place of using form tag . Html.BeginForm  Received 3 arguments .
Here, "Index" is Name of action that will be executed on posting form  to server
Here, "Home" is name of controller to which this link will be redirected when clicked
Here, " FormMethod.Get" type of encoding method that applied on data we are posting 

Now Open Controller And Add code below to Index Action of home controller

 if (searchby == "Gender")
            {
                return View(db.Employees.Where(x => x.Gender == search || search ==null).ToList());
            }
            else
            {
                return View(db.Employees.Where(x => x.Name.StartsWith(search)).ToList());
}


Friday 21 June 2013

Friday 11 October 2013

Masked TextBox in .NET

Masked TextBox Control in .NET are used to Restrict the input from user . Masked Edit controls are also used to change the format of output that is to be delivered . In vb 6 we have Mask Edit control But in VB.NET we can get Maskedtextbox 
from Toolbox. 

Tuesday 3 June 2014

MonoDevelop Cross Platform Using Csharp


MonoDevelop is a revolution in the era of Cross development by using Microsoft .NET programming language like Csharp ( C# ) , Visual Basic and Jsharp ( J# ) . Monodevelop has removed blame that Microsoft .NET software can only run on Windows platforms This makes possible to run .net applications and to build a .Net Application on any platform

MonoDevelop is a cross-platform IDE  developed for Csharp ( C# ) programming language  and other .NET programming languages. MonoDevelop allows programmers to program desktop softwares and ASP.NET Web applications and websites  on Linux, Windows  and Mac OSX. MonoDevelop  makes possible for .net programmers to run , create and deploy their .net software applications on cross-platforms Any  .NET application developed  with Visual Studio can be used in linux or Mac with the help of MonoDevelop

Windows platform is fully supported  for running MonoDevelop and it is fully accepted. In past there were many issues regarding Mono Development but now  Many Windows specific issues have been fixed, and ome add-ins such as debugging and subversion support have been written specifically for Windows and it is fully supported by windows

By developing with mono specifically, you will be able to run your executable on any platform that has mono available for it. That in and of itself is mono's biggest advantage over developing on MSFT's .Net platform. Said differently: If you build you assembly with mono, you're guarantee cross-platform support

Features Of MonoDevelop


  1. Multi-platform support

    It Supports Linux ( ubuntu etc ) , Windows( xp,7,8 etc ) and Mac OS X operating systems
  2. Advanced Text Editing Facilities

    It provides Code completion support for Csharp  4 that is lastest version for csharp
    It also provides  code templates and  code folding.
  3. Configurable workbench

    Fully customizable window layouts, user defined key bindings, external tools
  4. Multi-language programming Facilities

    Monodevelop supports various programming languages like - C#, Visual Basic.Net, C/C++, Vala
  1. GTK# Visual Designer

    Easily build GTK# applications


    Installation Steps for MonoDevelop in Windows

    1.   First you need to install GTK# for .NET, because the GTK# included with Mono is in Mono's      GAC
    2. Then After successfull Installation of Gtk# Now install Monodevelop. You can download Monodevelop from link below
      Download Monodevelop

    Installation Steps For Gtk# for MonoDevelop

    1. After Downloaded the Gtk# setup from link given in above section . Double click on setup and you will see the following startup screen

    MonoDevelop Cross Platform Using Csharp
  2. Click Next to proceed the installation
  3. Now here comes License Agreeement Click on Check Box to accept the license and click on Next Button
    MonoDevelop Cross Platform Using Csharp

  4. Now Choose or browse directory for Gtk# installation and click Next
    MonoDevelop Cross Platform Using Csharp

  5. In Next Window click install and you will the installtion progress
    MonoDevelop Cross Platform Using Csharp

    6. After full installation click on Finish

Installation Steps for Monodevelop


  1.  After Downloaded the MonoDevelop setup from link given in above section . Double click on setup and you will see the following startup screen
    MonoDevelop Cross Platform Using Csharp

  2. Click Next to proceed the installation 
  3. Now here comes License Agreeement Click on Check Box to accept the license and click on Next Button
    MonoDevelop Cross Platform Using Csharp


  4.  Now Choose or browse directory for  MonoDevelop installation and click Next
    MonoDevelop Cross Platform Using Csharp

  5. In Next Window click install and you will the installtion progress
    MonoDevelop Cross Platform Using Csharp


    MonoDevelop Cross Platform Using Csharp


  6. After full installation click on Finish


MonoDevelop Cross Platform Using Csharp

POSSIBLE ERRORS DURING MONO INSTALLATION


ERROR :- Gtk# version 2.12.9 or greater must be installed

Gtk# version 2.12.9 or greater must be installed

Go Here For Solution To this Error Fix Gtk# version 2.12.9 or greater must be installed

Wednesday 20 July 2016

Getting Started With Asp.net Core


Enjoy The New World Of Asp.net Core


Steps To Make & Run First Simple App In Asp.net Core

1. First Make Sure You Have Setup & Installed Asp.net Core . To See Steps To Install Asp.net Core See Link Below - 


2. If you are Done With Setting Up Asp.net Core . Press Windows Key + R to open Run Dialog . Type in cmd and Press Enter . It will Open Command Prompt 

3. Navigate To Directory Where you want to Save your Asp.net Core Project like - 
    
    CD My-Projects 
    ( It will change your Current Working Directory To My-Projects Folder / Directory )

4., Now Run Below Command One By One
     
     mkdir aspnetcoreapp
     ( If will make a new Folder with name aspnetcoreapp )
     cd aspnetcoreapp
     ( It Will change Current Directory to aspnetcoreapp)
.
     dotnet new
     ( It will create a new Asp.net Core app for you ) . 

    What is Donet Command ? - 

    Don't Worry About Dotnet Command With Installation of Asp.net Core you can use dotnet  command . It is new gift of Asp.net Core RC2 for CLI . 

It will Give Detailed Post About DNX & Dotnet Commands in CLI In coming Post 


Installing Asp.net Core


Steps To Install Asp.net Core


Step 1. Before Installing Asp.net Core Let Fulfill Its Prerequisites As Below -

First you need to Install Visual Studio 2015 . You Can Download Free Visual Studio Community Edition From Link below -
Download Visual Studio 2015

For Mac & Linux Users You Can Use Visual Studio Code -
Download Visual Studio Code & Read Its All Details 

Step 2. After Download & Installing Visual Studio 2015 you need to make sure you have Visual Studio 2015 Update 3 Installed . You Can Download Visual Studio 2015 Update 3 From Link Below -
Download Visual Studio 2015 Update 3

Real ALL Details About Visual Studio 2015 Update 3 Here -
What's New Added in Visual Studio Update 3

Step 3 -  Please Check Out All Dependencies of Asp.net Core Before Installing it . See All Dependencies of Asp.net Core For All OS -
Dependencies of Asp.net Core

Step 4 - Now Download & Install Asp.net Core From link below -
Download Asp.net Core

Step 5 - Now Asp.net Core is Setup Head Towards Next Post To Make First Sample App in Asp.net Core To Make Ensure its setup Correctly . Link TO Next Post is Below - 

Sunday 20 July 2014

Install Monodevelop on Linux

MonoDevelop is a revolution in the era of Cross development by using Microsoft .NET programming language like Csharp ( C# ) , Visual Basic and Jsharp ( J# ) . Monodevelop has removed blame that Microsoft .NET software can only run on Windows platforms This makes possible to run .net applications and to build a .Net Application on any platform

MonoDevelop is a cross-platform IDE  developed for Csharp ( C# ) programming language  and other .NET programming languages. MonoDevelop allows programmers to program desktop softwares and ASP.NET Web applications and websites  on Linux, Windows  and Mac OSX. MonoDevelop  makes possible for .net programmers to run , create and deploy their .net software applications on cross-platforms Any  .NET application developed  with Visual Studio can be used in linux or Mac with the help of MonoDevelop

Windows platform is fully supported  for running MonoDevelop and it is fully accepted. In past there were many issues regarding Mono Development but now  Many Windows specific issues have been fixed, and ome add-ins such as debugging and subversion support have been written specifically for Windows and it is fully supported by windows

By developing with mono specifically, you will be able to run your executable on any platform that has mono available for it. That in and of itself is mono's biggest advantage over developing on MSFT's .Net platform. Said differently: If you build you assembly with mono, you're guarantee cross-platform support

Features Of MonoDevelop


  1. Multi-platform support

    It Supports Linux ( ubuntu etc ) , Windows( xp,7,8 etc ) and Mac OS X operating systems
  2. Advanced Text Editing Facilities

    It provides Code completion support for Csharp  4 that is lastest version for csharp
    It also provides  code templates and  code folding.
  3. Configurable workbench

    Fully customizable window layouts, user defined key bindings, external tools
  4. Multi-language programming Facilities

    Monodevelop supports various programming languages like - C#, Visual Basic.Net, C/C++, Vala

GTK# Visual Designer

Easily build GTK# applications

Installation Steps for MonoDevelop in Ubuntu 


You can also see installation of monodevelop on Windows Here :-
So, when you are going to start installation of monodevelop on ubuntu , i am trying it on ubuntu version 12.04 one thing you want to remember is you can install monodevelop on ubuntu with various methods it includes various packages and you should never install them one by one you should also go for a complete package for installation of monodevelop on ubuntu .
1. Press Ctrl + Alt + T and it will Opens Terminal Screen 

2. Type in the following command to install monodevelop :-

sudo apt-get install monodevelop
3. Then Hit Enter

4. If you got the following error :-

Error :- Unable to locate the package monodevelop

This is common error that number of users that are installing monodevelop on ubuntu face . So don't fear from this error this is simple error as it is unable to locate the monodevelop so it means there is need to update the software center or software repository of ubuntu to locate the monodevelop product

5. So simple solution of this error is open Terminal and fire the following command :-

sudo apt get update


and then Hit enter

6. This command requires internet connection and it may take some time to get completed and if this command completes successfully then now monodevelop would be located

7. Now run the following command to install monodevelop

sudo apt-get install monodevelop

8. First it will  prompt you for installation procedure of monodevelop Press y to conform 'Yes'

9. Then It will automatically install and files , packages required for mono
Now you will se a monodevelop icon on your ubuntu sidebar like below -- the blue monodevelop icon


10. click on blue monodevelop icon and you will be presented with monodevelop IDE


Tuesday 25 June 2013

FROM VB6 TO VB.NET

The switch form the old visual studio versiom6 to newer Visual Studio .NET to Create Visual BAsic
programs represents a update in technology . It represents far more than changing of a version name. When upgrading from Visual Studio 6 , Instead of naming it version , Microsoft used the term .NET as the name of the new version to denate the difference that it carries from the older technology .Faculty members teaching programming courses in visual  basic have to learn about the changes in new version of visual basic in order to Switch from teaching the older vb6.

Tuesday 11 November 2014

Benefits of Html Helpers in Asp.Net MVC

So today i am going to give an overview on Html helpers in Asp.Net MVC . So first questions that stuck our mind are -

 What are Html helpers ?
 Why to use them instead of using simple Html coded controls
 What are their benefits in Asp.Net MVC

Html helpers are very much similar to Asp.Net web controls . But Html helpers are much more lightweight as compared to Asp.net Web forms Server controls . The similarity between server controls in Asp.net webforms and Html helpers in Asp.Net MVC are Viewstate . Means they both contain the ability to hold or update the data on postbacks using ViewStates for each controls .

Main  Benefits Of using Html Helpers in Asp.net MVC

  • MVC Html Helpers contains Overloaded Methods like IPostBackDataHandler that Pre-populate the values of html helpers means it works similar to as viewstates
  • Html Helpers is also having one more advantage It provide inbuilt Validation for html helpers textboxes 
Available HTML Helpers 

There following HTML helpers can be used to render (modify and output) HTML form elements:

  1. BeginForm()
  2. EndForm()
  3. TextArea()
  4. TextBox()
  5. CheckBox()
  6. RadioButton()
  7. ListBox()
  8. DropDownList()
  9. Hidden()
  10. Password()

Sample Code To Demonstrate Use of Html Helpers


ASPX CODE

<%= Html.ValidationSummary("Create was unsuccessful. Please correct the errors and try again.") %>
<% using (Html.BeginForm()){%>
<p>
<label for="FullName">FullName</label>
<%= Html.TextBox("FullName") %>
<%= Html.ValidationMessage("FullName", "*") %>
</p>
<p>
<label for="Username">Username</label>
<%= Html.TextBox("Username") %>
<%= Html.ValidationMessage("Username", "*") %>
</p>
<p>
<label for="Password">Password:</label>
<%= Html.Password("Password") %>
<%= Html.ValidationMessage("Password", "*") %>
</p>
<p>
<label for="Password">Confirm Password:</label>
<%= Html.Password("ConfirmPassword") %>
<%= Html.ValidationMessage("ConfirmPassword", "*") %>
</p>
<p>
<%= Html.CheckBox("ReceiveNewsletter") %>
<label for="ReceiveNewsletter" style="display:inline">Receive Newsletter?</label>
</p>
<p>
<input type="submit" value="Register" />
</p>
<%}%>

RAZOR CODE

@Html.ValidationSummary("Create was unsuccessful. Please correct the errors and try again.")
@using (Html.BeginForm()){ 
<p>
<label for="FullName">FullName</label>
@Html.TextBox("FullName")  
@Html.ValidationMessage("FullName", "*")  
</p>
<p>
<label for="Username">Username</label>
@Html.TextBox("Username")  
@Html.ValidationMessage("Username", "*")  
</p>
<p>
<label for="Password">Password:</label>
@Html.Password("Password")  
@Html.ValidationMessage("Password", "*")  
</p>
<p>
<label for="Password">Confirm Password:</label>
@Html.Password("ConfirmPassword")  
@Html.ValidationMessage("ConfirmPassword", "*")  
</p>
<p>
@Html.CheckBox("ReceiveNewsletter")  
<label for="ReceiveNewsletter" style="display:inline">Receive Newsletter?</label>
</p>
<p>
<input type="submit" value="Register" />
</p>

Tuesday 6 December 2016

Difference Between System.Web and System.WebServer


System.web is the settings section for IIS6 and the built in cassini server (the test server in Visual Studio 2010 and before where you are targeting asp.net 3.5 or lower)

The system.webserver is a child of the configuration section that means in web.config file <system.webserver> tag is placed under
<configuration> Tag.

System.WebServer Tag is contained in web.config file in root directory of website. This file contains configuration that needs to be implemented on IIS for Current project. Configuration coded in <system.webserver> Tag are implemented on IIS and are only applied to Project or Webapplication to which corresponding web.config Belongs. This Tag Can Exist is one of below formats in your project's web.config file in root directory of Web Application.

Empty <system.webserver> Tag Under <configuration> Tag -

<configuration>
  <system.webServer>
  </system.webServer>
</configuration>

The system.web section is used in web.config file of Asp.net WebApplications for defining Server Configuration that are applicable for IIS 6, while the system.webserver version is used to configure IIS 7.0. IIS 7.0 includes a new ASP.NET pipeline and some configuration differences. you can check complete details on link below -

https://msdn.microsoft.com/en-us/library/bb763179.aspx


System.webserver is the Server Configuration section for IIS 7 and above, and the build in IIS Express server which is used in Visual Studio 2010 targeting asp.net 4 and any newer versions that are released in the future.

Sample of Web.config file Contains Both <system.web> and <system.webserver>

<?xml version="1.0"?>
<!--
    Note: As an alternative to hand editing this file you can use the
    web admin tool to configure settings for your application. Use
    the Website->Asp.Net Configuration option in Visual Studio.
    A full list of settings and comments can be found in
    machine.config.comments usually located in
    \Windows\Microsoft.Net\Framework\v2.x\Config
-->
<configuration>
<appSettings>
<add key="username" value="admin-heemanshu@564496"/>
<add key="password" value="@htennty50!334#"/>
</appSettings>

<connectionStrings/>

<system.web>
<!--
            Set compilation debug="true" to insert debugging
            symbols into the compiled page. Because this
            affects performance, set this value to true only
            during development.

            Visual Basic options:
            Set strict="true" to disallow all data type conversions
            where data loss can occur.
            Set explicit="true" to force declaration of all variables.
        -->
<compilation debug="true" strict="false" explicit="true"/>
<pages>
<namespaces>
<clear/>
<add namespace="System"/>
<add namespace="System.Collections"/>
<add namespace="System.Collections.Specialized"/>
<add namespace="System.Configuration"/>
<add namespace="System.Text"/>
<add namespace="System.Text.RegularExpressions"/>
<add namespace="System.Web"/>
<add namespace="System.Web.Caching"/>
<add namespace="System.Web.SessionState"/>
<add namespace="System.Web.Security"/>
<add namespace="System.Web.Profile"/>
<add namespace="System.Web.UI"/>
<add namespace="System.Web.UI.WebControls"/>
<add namespace="System.Web.UI.WebControls.WebParts"/>
<add namespace="System.Web.UI.HtmlControls"/>
</namespaces>
</pages>

<!--
            The <authentication> section enables configuration
            of the security authentication mode used by
            ASP.NET to identify an incoming user.
               -->

<authentication mode="Windows"/>

<!--
            The <customErrors> section enables configuration
            of what to do if/when an unhandled error occurs
            during the execution of a request. Specifically,
            it enables developers to configure html error pages
            to be displayed in place of a error stack trace.-->
<customErrors mode="Off" defaultRedirect="GenericErrorPage.htm">
<error statusCode="404" redirect="FileNotFound.htm"/>
</customErrors>
</system.web>
 
      <system.webServer>
       <rewrite>
        <rules>
          <rule name="Redirect" patternSyntax="ECMAScript" stopProcessing="true">
            <match url=".*" />
            <conditions>
                <add input="{HTTP_HOST}" pattern="^xyz.com$" />
            </conditions>
            <action type="Redirect" url="http://www.xyz.com/{R:0}" />
         </rule>
       </rules>
     </rewrite>
    </system.webServer>

</configuration>