Sunday 13 July 2014

Getting Started and Deploy Asp.net App with Appharbor -- Cloud Platform as a service

CLOUD - So first thing we need to know here is what is a Cloud ? and how it is useful to us to use Cloud. Cloud is long network of interconnected computers that allow the avaliability of data over internet all the time .Cloud help to make our data secure and allow the user to run its application on cloud with full scalability and availaibility . We say it provides avalaibility of 100% because Cloud follows the approach of Replication of data to the other nodes to make ensuring the full availaibility of data even when the server that is actually assumed to have data or application is not availaible .

If we are accessing an Application on Cloud and at that particular time that server is down so how our Application Deployed on Server could be accessed Cloud Computing gives answer of this question By Cloud Computing when we deploy our application on cloud then cloud computing will replicate your application to other connected nodes also so that your application will be availabile when one of node is off and unable to provide the access to your application

AppHarbor is a fully hosted .NET Platform as a Service. AppHarbor can deploy and scale any standard .NET application to the cloud. AppHarbor is easy and simple to use . It provides number of additional addons for database and other applications to add it to your application. Here I am going to tell all the procedure to create and deploy asp.net application to appharbor cloud service.

Step1

Start your Browser and Put this Url in your address bar and Navigate to AppHarbor Website :- https://appharbor.com/ and Hit Enter

Step2
Click on  Get started Button . Then do simple signup procedure .Then Login to your AppHarbor Account.

Step3
After login Click on Your Applications Menu item on Top Menu Bar and Create a New application by supplying a name for the application Then Finally click on Create New Button


Step4
Now New application is successfully created on cloud . Now for deploying a .Net application with Sql Server database We require to add Sql server as a Addon to Our cloud App

Step5
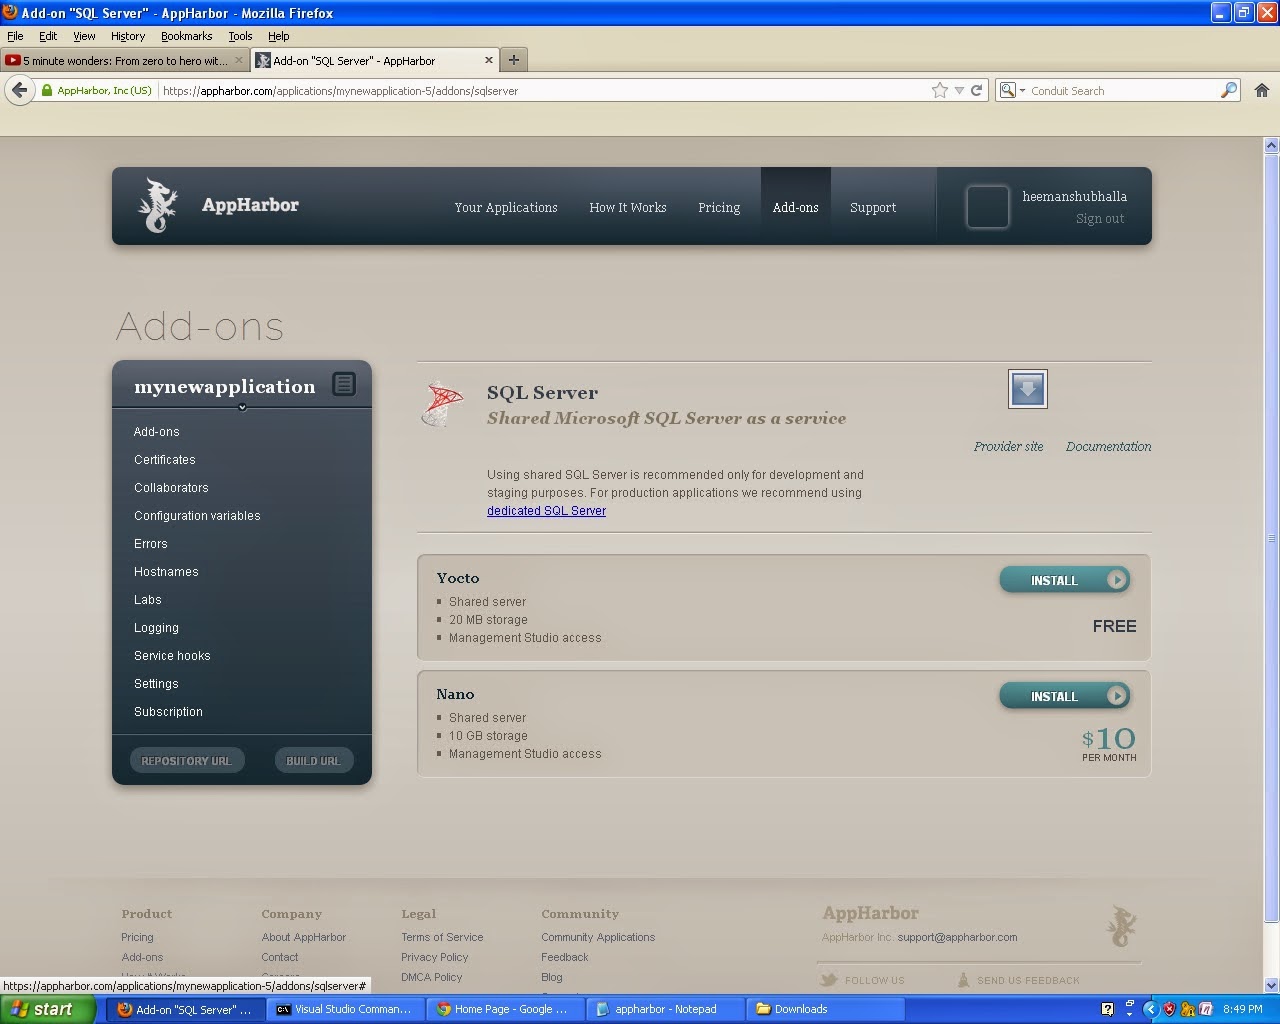
Now click on Add Ons on sidebar Menu Then Scroll down and find Sql Server and Click on it.


Step6
Now SQL  SERVER Add details are shown Click on Free Install button . Then SQL SERVER add on will be installed for your application to use sql server database with .net application in cloud


Step7
Now on SQL SERVER Installation Success screen click on  sql server


Step8
Then click on Go To  Sql Server . Now your sql server Instance Details will be shown . The most important thing we need is connection string of database instance

Step9
Copy this connection string we will require it in Further steps

Step10
Now open your Visual Studio Command Prompt . It will be availaible in Microsoft visual studio 2010/2012 folder , if not found you can comment here on this post

Step11
Write the following command on this :-
 aspnet_regsql -A all -C "place your copied connection string here"     Now hit enter


Step12
Now Open Visual studio Click on File Click on New Project Choose ASP.NET WEB APPLICATION give it a Name and give proper save path like I give "C:/WindowsApplication3" and Hit Ok


Step13
Now Visual Studio will Present you with practice project already having some coded files .

Step14
Now open Web.Release.config file Uncomment the connectionstring tag and Replace the name of connection add tag to  "ApplicationServices" and Paste the connection we have copied earlier here and finally Press Ctrl + s to save all content . Now all work with visual studio is done.  Just  Run you application on localhost to know its working fine or not and it also compile all the code that is must required to deploy app on appharbor


 Step15
Now Open Git Bash If you have not installed it yet then wait for next article in which i will tell how to install Git Bash

Step16
After opening Git Bash Navigate to directory where you have saved your .net project like I have saved it in "C:/WebApplication3" . Use this command to go to this directory

cd c:/WebApplication3             Then Hit enter


Step17
Now Run following command to initialize Git Repository
 git init


Step18
Run following command to add repository to Git
git add .


Step19
Run following command to commit your data to Git repository
git commit -m "Added Project To Git:"


Step20
Sometime It may ask you for your Email Address pass it using following command
git config --global user.email "yourmail@example.com"

Step21
Now Clone your git Repository for that we require Repository Url for that Go to Appharbor.com then click on your applications Then Click on Application you have created Then in Sidebar click on   Repository Url then it will be automatically copied to your clipboard

 Step22
Now run the following command  :-
git remote add appharbor "paste copied url here"    ...........then hit enter


Step23
Now push your data or application to cloud or Git Repository by using following command
git push appharbor master

Step24
Now it will ask for password then enter password of your appharbor account and Hit Enter Now it will copy all files to Git Repository


Step25
Now your Application is successfully deployed to cloud To check it online you can first refresh your webpage where you have opened Appharbor account Then go to application we have created on appharbor and click on Hostnames and you can see a url there click on it or open it in new  tab it will show your website that you have uploaded

Tuesday 3 June 2014

create you first app in Monodevelop csharp


  1. After Successfull Installation of MonoDevelop We will start with making our first Hello World App in MonoDevelop . If you have not Installed MonoDevelop you can get Installation Guide here

    Installation Guide For MonoDevelop
  2. Start you M onoDevelop that you have installed already. It opens with following screen
      Gtk# version 2.12.9 or greater must be installed

  3. Now to create a simple app in MonoDevelop Click on File Menu --> Then click on Solution
    Gtk# version 2.12.9 or greater must be installed

  4. Then a window appears Click on Gtk# project and give Project a Name and click oK
    Gtk# version 2.12.9 or greater must be installed

  5. Now your project open with a code window with Main.cs file as below
    Gtk# version 2.12.9 or greater must be installed

  6. Now right click on your proect in sidebar then click on Add and in Submenu click on New File
    Gtk# version 2.12.9 or greater must be installed

  7. Then click on Window give it a name and click ok
    Gtk# version 2.12.9 or greater must be installed

  8. You can see you have two views Designer and source view .Designer view will be used for Designing GUI for your application and source will be used for coding
    Gtk# version 2.12.9 or greater must be installed

  9. Now open new window file you have added and goto design view
  10. now from Toolbar in right sidebar Go to containers section and double click on Fixed Container to get it on your window
    Gtk# version 2.12.9 or greater must be installed

  11. Now take a button from Toolbar
    Gtk# version 2.12.9 or greater must be installed

  12. select the button Now click on properties window and click on Signals Tab
    Gtk# version 2.12.9 or greater must be installed

  13. Now click on Clicked property and give a valid name for click event function and Hit Enter
    Gtk# version 2.12.9 or greater must be installed

  14. Now first add reference to system.windows.forms Namespace for that Right click on project in sidebar and click on Edit Reference
    Gtk# version 2.12.9 or greater must be installed

  15. Search for system.windows.forms in search box and click check mark on check Box and click ok
    Gtk# version 2.12.9 or greater must be installed

  16. Now come to Souce view and you will see code like below

    protected void clickevent (object sender, EventArgs e)
    {
    throw new System.NotImplementedException ();
    }
  17. Remove " throw new System.NotImplementedException ();" line and Add line as below

    MessageBox.Show("Hello Welcome To Mono World");
  18. Now Save All your project change by pressing Ctrl + s
  19. Now Press F5 To Run your project and It will show output below
    Gtk# version 2.12.9 or greater must be installed


Gtk# version 2-12-9 or greater must be installed


  1. If you are suffering from this error during start of installation of MonoDevelop then main cause of this error is wrong installation of Gtk# . The best solution for this problem with which i have solved this error is to Download and Install Gtk Version 2.12.9 . The Download link is given below :-

Download Gtk version 2.12.9


All GTK Versions


Complete Installation Guide For MonoDevelop Install

MonoDevelop Cross Platform Using Csharp


MonoDevelop is a revolution in the era of Cross development by using Microsoft .NET programming language like Csharp ( C# ) , Visual Basic and Jsharp ( J# ) . Monodevelop has removed blame that Microsoft .NET software can only run on Windows platforms This makes possible to run .net applications and to build a .Net Application on any platform

MonoDevelop is a cross-platform IDE  developed for Csharp ( C# ) programming language  and other .NET programming languages. MonoDevelop allows programmers to program desktop softwares and ASP.NET Web applications and websites  on Linux, Windows  and Mac OSX. MonoDevelop  makes possible for .net programmers to run , create and deploy their .net software applications on cross-platforms Any  .NET application developed  with Visual Studio can be used in linux or Mac with the help of MonoDevelop

Windows platform is fully supported  for running MonoDevelop and it is fully accepted. In past there were many issues regarding Mono Development but now  Many Windows specific issues have been fixed, and ome add-ins such as debugging and subversion support have been written specifically for Windows and it is fully supported by windows

By developing with mono specifically, you will be able to run your executable on any platform that has mono available for it. That in and of itself is mono's biggest advantage over developing on MSFT's .Net platform. Said differently: If you build you assembly with mono, you're guarantee cross-platform support

Features Of MonoDevelop


  1. Multi-platform support

    It Supports Linux ( ubuntu etc ) , Windows( xp,7,8 etc ) and Mac OS X operating systems
  2. Advanced Text Editing Facilities

    It provides Code completion support for Csharp  4 that is lastest version for csharp
    It also provides  code templates and  code folding.
  3. Configurable workbench

    Fully customizable window layouts, user defined key bindings, external tools
  4. Multi-language programming Facilities

    Monodevelop supports various programming languages like - C#, Visual Basic.Net, C/C++, Vala
  1. GTK# Visual Designer

    Easily build GTK# applications


    Installation Steps for MonoDevelop in Windows

    1.   First you need to install GTK# for .NET, because the GTK# included with Mono is in Mono's      GAC
    2. Then After successfull Installation of Gtk# Now install Monodevelop. You can download Monodevelop from link below
      Download Monodevelop

    Installation Steps For Gtk# for MonoDevelop

    1. After Downloaded the Gtk# setup from link given in above section . Double click on setup and you will see the following startup screen

    MonoDevelop Cross Platform Using Csharp
  2. Click Next to proceed the installation
  3. Now here comes License Agreeement Click on Check Box to accept the license and click on Next Button
    MonoDevelop Cross Platform Using Csharp

  4. Now Choose or browse directory for Gtk# installation and click Next
    MonoDevelop Cross Platform Using Csharp

  5. In Next Window click install and you will the installtion progress
    MonoDevelop Cross Platform Using Csharp

    6. After full installation click on Finish

Installation Steps for Monodevelop


  1.  After Downloaded the MonoDevelop setup from link given in above section . Double click on setup and you will see the following startup screen
    MonoDevelop Cross Platform Using Csharp

  2. Click Next to proceed the installation 
  3. Now here comes License Agreeement Click on Check Box to accept the license and click on Next Button
    MonoDevelop Cross Platform Using Csharp


  4.  Now Choose or browse directory for  MonoDevelop installation and click Next
    MonoDevelop Cross Platform Using Csharp

  5. In Next Window click install and you will the installtion progress
    MonoDevelop Cross Platform Using Csharp


    MonoDevelop Cross Platform Using Csharp


  6. After full installation click on Finish


MonoDevelop Cross Platform Using Csharp

POSSIBLE ERRORS DURING MONO INSTALLATION


ERROR :- Gtk# version 2.12.9 or greater must be installed

Gtk# version 2.12.9 or greater must be installed

Go Here For Solution To this Error Fix Gtk# version 2.12.9 or greater must be installed

Wednesday 21 May 2014

How to use mysql database in csharp

INTRODUCTION


In this article i am going to show how to connect a csharp database with mysql database and how to perform basic operations like inserting record in database , delete a specific record from database , updating a specific record and viewing all data and binding the data to datagridview . Mostly with Csharp Applications you have used MSSQL database but we can also use mysql database for this purpose
DOWNLOAD MYSQL WITH CSHARP APP


REQUIREMENTS

  • Visual Studio 2010 or Visual Studio 2012 
  • MYSQL Database installed with admin roles
  • Dot/connector connec

WHAT WE ARE GOING TO COVER


In this Article we are going to cover the following points
  1. Connect Csharp with mysql
  2. Insert data in mysql database with Csharp code
  3. Delete data in mysql database with Csharp code
  4. Update data in mysql database with Csharp code
  5. Select data in mysql database with Csharp code

CREATING DATABASE


First of Start your Wamp server or Xamp server services This will start Phpmyadmin where all database or SQL related work will be done . Phpmyadmin will be used for create new database schemas and other database oprations are done.

  • Start Wamp / xampp server

How to use mysql database in csharp
  • Then Click on phpMyAdmin as shown in Image above .
  • Now you will get a screen like the image below

    How to use mysql database in csharp
  • If you are using default password for Phpmyadmin then directly click on Go button . Then you will get a screen like below 
  • Then click on Databases as shown in image below to create a new database that will be required for this Application
    How to use mysql database in csharp
  • Then you will get window as shown below Fill up the Database name and Click on Create button
    How to use mysql database in csharp
  • After database is created Now Run the database script we have provided in this tutorial in next steps and run this script as shown in image below ........Just go to sql Tab and paste full script there.

    How to use mysql database in csharp
    • Remember one thing use same name of database as i have given in the snapshot

    DOWNLOAD DATABASE SCRIPT FILE

    Database Script File

    DOWNLOAD FULL PROJECT WITH CODE

    Download Complete project How to use mysql database in csharp

    DOWNLOAD MYSQL CONNECTOR DLL's FOR DOTNET

    For connecting Mysql with Csharp in dotnet you must have connector . you require Connector/NET for mysql connectivity with csharp . you can download Mysql connector / Net from link below :-

    Download Dotnet connector for mysql and csharp


    HOW TO USE MYSQL DLL's

    STEPS :- 

    • Right Click on Solution Name
    • In pop-up menu click on Add Reference
      How to use mysql database in csharp
    • Now select Mysql.Data and Click ok
      How to use mysql database in csharp
    • you can also browse for dll downloaded from Browse Tab
      How to use mysql database in csharp
    • Now MySQL.Data dll file will be added successfully to solution .

    INSERT RECORD IN MYSQL DATABASE USING CSHARP CODE


    How to use mysql database in csharp
    CODE :-
      con.Open();
                MySqlCommand cmd = new MySqlCommand("insert into table1(name,branch,phone) values(@name,@branch,@phone)", con);
                cmd.Parameters.AddWithValue("@name", textBox1.Text);
                cmd.Parameters.AddWithValue("@branch", textBox2.Text);
                cmd.Parameters.AddWithValue("@phone", Convert.ToInt32(textBox3.Text));

                cmd.ExecuteNonQuery();
                con.Close();
                MessageBox.Show("Record Inserted");

    EXPLANATION :- 
    1. First Connection is opened to mysql connection using connection string
    2. Then Using MySqlCommand class we are passing insert query to mysql database using con object that is used for establishing connection to mysql database
    3. Then @name,@branch,@phone are parameters given to query to dynamically pass data to query
    4. Then parameters are passed to query dynamically using following line of code
      cmd.Parameters.Addwithvalue('parametername' , 'value' );
    5. cmd.ExecuteNonQuery is used to execute the query in cmd object to database 
    6. con.close closes the connection to the database

    DELETE RECORD IN MYSQL DATABASE USING CSHARP CODE                                      


    How to use mysql database in csharp

    CODE :-

    con.Open();
                if (comboBox1.Text != "")
                {
                    MySqlCommand cmd = new MySqlCommand("delete from table1 where id=@id", con);
                    cmd.Parameters.AddWithValue("@id", comboBox1.Text);
                                cmd.ExecuteNonQuery();                                                                                                                   
                                 con.close();


    EXPLANATION :- 

    1. First Connection is opened to mysql connection using connection string
    2. Then Using MySqlCommand class we are passing insert query to mysql database using con object that is used for establishing connection to mysql database
    3. Then @id is parameter given to query to dynamically pass data to query
    4. Then parameters are passed to query dynamically using following line of code
      cmd.Parameters.Addwithvalue('parametername' , 'value' );
    5. cmd.ExecuteNonQuery is used to execute the query in cmd object to database 
    6. con.close closes the connection to the database

    UPDATE RECORD IN MYSQL DATABASE USING CSHARP CODE


    How to use mysql database in csharp

    CODE :-

     MySqlCommand cmd = new MySqlCommand("update table1 set name=@name,branch=@branch,phone=@phone where id=@id", con);
                cmd.Parameters.AddWithValue("@name",textBox6.Text );
                cmd.Parameters.AddWithValue("@branch",textBox5.Text );
                cmd.Parameters.AddWithValue("@phone",textBox4.Text);
                cmd.Parameters.AddWithValue("@id",comboBox2.Text  );
              
                cmd.ExecuteNonQuery();
                MessageBox.Show("Record Updated");

    EXPLANATION :- 

    1. First Connection is opened to mysql connection using connection string
    2. Then Using MySqlCommand class we are passing insert query to mysql database using con object that is used for establishing connection to mysql database
    3. Then @name,@branch,@phone,@id are parameters given to query to dynamically pass data to query to state which field value are to be replaced
    4. Then parameters are passed to query dynamically using following line of code
      cmd.Parameters.Addwithvalue('parametername' , 'value' );
    5. cmd.ExecuteNonQuery is used to execute the query in cmd object to database 
    6. con.close closes the connection to the database

    SELECT RECORD IN MYSQL DATABASE USING CSHARP CODE


    How to use mysql database in csharp

    CODE :-


     MySqlCommand cmd = new MySqlCommand("select * from table1 where id=@id", con);
                cmd.Parameters.AddWithValue("@id", comboBox2.Text);
                MySqlDataAdapter da = new MySqlDataAdapter();
                da.SelectCommand = cmd;
                DataTable dt = new DataTable();
                da.Fill(dt);
                if (dt.Rows.Count > 0)
                {
                    textBox6.Text =dt.Rows [0][1].ToString ();
                        textBox5.Text =dt.Rows [0][2].ToString ();
                        textBox4.Text = dt.Rows[0][3].ToString();
                }


    EXPLANATION :- 

    1. First Connection is opened to mysql connection using connection string
    2. Then Using MySqlCommand class we are passing insert query to mysql database using con object that is used for establishing connection to mysql database
    3. Then @name,@branch,@phone,@id are parameters given to query to dynamically pass data to query to state which field value are to be replaced
    4. Then parameters are passed to query dynamically using following line of code
      cmd.Parameters.Addwithvalue('parametername' , 'value' );
    5. Then we have used MySqlDataAdapter that act as a pipeline between database and csharp app . It takes or select query from csharp application and then make interface or link to database and execute the query in database and get result returned by query executed in database
    6. Then it fill the returned result in placeholder called DataTable that saves data returned from or retrieved from database into tabulated form
    7. Now if (dt.Rows.Count >0) checks if dt contains some item then put the data in respective text fields

    Full Code For Insert update delete and select Data from Mysql in Csharp Application  ( C# )


    using System;
    using System.Collections.Generic;
    using System.ComponentModel;
    using System.Data;
    using System.Drawing;
    using System.Linq;
    using System.Text;
    using System.Windows.Forms;
    using MySql;
    using MySql.Data;
    using MySql.Data.MySqlClient;

    namespace mysql
    {
        public partial class Form1 : Form
        {
           public  MySqlConnection con = new MySqlConnection("server=localhost;Uid=root;pwd=;Database=sqldotnet");
            public Form1()
            {
                InitializeComponent();
            }

            private void Form1_Load(object sender, EventArgs e)
            {
                retrieve();
            }
            public void retrieve()
            {

                {
                    MySqlCommand cmdsel = new MySqlCommand("select *  from table1 ", con);
                    MySqlDataAdapter dasel = new MySqlDataAdapter();
                    dasel.SelectCommand = cmdsel;
                    DataTable dtsel = new DataTable();
                    dasel.Fill(dtsel);
                    dataGridView1.DataSource = dtsel;
                }
                {
                    int cnt = comboBox1.Items.Count;
                    for (int counter = 0; counter < cnt; counter++)
                    {
                        comboBox1.Items.RemoveAt(0);
                        comboBox2.Items.RemoveAt(0);
                    }
                }
                MySqlCommand cmd = new MySqlCommand("select id  from table1 ", con);
                MySqlDataAdapter da = new MySqlDataAdapter();
                da.SelectCommand = cmd;
                DataTable dt = new DataTable();
                da.Fill(dt);
                if (dt.Rows.Count > 0)
                {
                    int cnt = dt.Rows.Count;
                    for (int counter = 0; counter < cnt; counter++)
                    {
                        comboBox1.Items.Add(dt.Rows[counter][0].ToString());
                        comboBox2.Items.Add(dt.Rows[counter][0].ToString());
                    }
                }
                comboBox1.Text = "";
                comboBox2.Text = "";
            }
       
    //Delete Record
            private void button2_Click_1(object sender, EventArgs e)
            {
                con.Open();
                if (comboBox1.Text != "")
                {
                    MySqlCommand cmd = new MySqlCommand("delete from table1 where id=@id", con);
                    cmd.Parameters.AddWithValue("@id", comboBox1.Text);
                    cmd.ExecuteNonQuery();
                    retrieve();
                }
                MessageBox.Show("Record Deleted");
            }
    //select Data
            private void comboBox2_SelectedIndexChanged(object sender, EventArgs e)
            {
                MySqlCommand cmd = new MySqlCommand("select * from table1 where id=@id", con);
                cmd.Parameters.AddWithValue("@id", comboBox2.Text);
                MySqlDataAdapter da = new MySqlDataAdapter();
                da.SelectCommand = cmd;
                DataTable dt = new DataTable();
                da.Fill(dt);
                if (dt.Rows.Count > 0)
                {
                    textBox6.Text =dt.Rows [0][1].ToString ();
                        textBox5.Text =dt.Rows [0][2].ToString ();
                        textBox4.Text = dt.Rows[0][3].ToString();
                }
            }
    //Update Data
            private void button3_Click_1(object sender, EventArgs e)
            {
                MySqlCommand cmd = new MySqlCommand("update table1 set name=@name,branch=@branch,phone=@phone where id=@id", con);
                cmd.Parameters.AddWithValue("@name",textBox6.Text );
                cmd.Parameters.AddWithValue("@branch",textBox5.Text );
                cmd.Parameters.AddWithValue("@phone",textBox4.Text);
                cmd.Parameters.AddWithValue("@id",comboBox2.Text  );
             
                cmd.ExecuteNonQuery();
                MessageBox.Show("Record Updated");
                retrieve();
            }
    //Insert Data
            private void button1_Click_1(object sender, EventArgs e)
            {
                con.Open();
                MySqlCommand cmd = new MySqlCommand("insert into table1(name,branch,phone) values(@name,@branch,@phone)", con);
                cmd.Parameters.AddWithValue("@name", textBox1.Text);
                cmd.Parameters.AddWithValue("@branch", textBox2.Text);
                cmd.Parameters.AddWithValue("@phone", Convert.ToInt32(textBox3.Text));

                cmd.ExecuteNonQuery();
                con.Close();
                MessageBox.Show("Record Inserted");
                retrieve();
            }
        }
    }


    Wednesday 7 May 2014

    sql insert , Update , delete using c#


    To connect Database from your Windows Application is required  to make Application for querying the database and retrieve the desired result from database . Database in widely used in management software's  and various applications to save record and search the record .

    Database dependent applications are widely used in the market . ERP projects of organisation are highly Database dependent applications . The main two types of databa se that are widely used in .NET Applications :-

    * Microsoft Access Database
    * MSSQL Server ( Microsoft Structured Query Language )


    The main Languages used in .NET Platform for connecting windows application to database are :-

    * C#
    * VB#

    Sql ( Structured Query Language ) is most widely used Database . It is free and Opensource Database . It has simple query structure to Manipulate data from database in Database applications 

    To Learn About SQL and how to learn SQL you can go to following links first then go forward :-

    SQL Tutorial with Examples and snapshots

    insert , update , delete , select queries sql

    Download Database Script file and execute it in your SQL Server

    Steps To Execute this Script file -

    1. Download Script file from link below .

    2. Now open it with MsSql .
    3. Now Create Database Named  'Accounts_database' in MsSql server 
    4. Now select this database from Dropdown 
    5. And Execute the Script code by clicking F5 .

    Design of Form 

    Download Complete Project File


    1. In Design We have some Fields to be filled to insert Data To database

    2. We are having 3 Buttons - One for Update and Insert Operation , Second For Delete Operation and Third for Exit or close form

    3. We are using Datagrid View to Instantly Showing The data in database and it is updated when we insert new data to database or we delete data from database

                                                       Insertion/Updation In Database 


    1. For insertion of data Fill the fields on form Only Code and Agency Name is required and rest of the fields are optional fields


    2. Now you can see filled data is successfully inserted and it is immediately shown in below datagridview


    CODE For Insert/Update


     try


     {
                    SqlCommand cmd1 = new SqlCommand("select * from Agency_detail where  Agency_code=" + textBox1.Text, con);
                    SqlDataAdapter da1 = new SqlDataAdapter();
                    DataTable dt1 = new DataTable();
                    da1.SelectCommand = cmd1;
                    da1.Fill(dt1);
                    if ((dt1.Rows.Count > 0) && (dt1.Rows[0][0].ToString() != ""))
                    {
                        if (MessageBox.Show("ID Already Exist Do you want to Update It", "Confirm", MessageBoxButtons.YesNo, MessageBoxIcon.Question) == DialogResult.Yes)
                        {
                            SqlCommand cmdupdate = new SqlCommand("update Agency_detail set Agency_Name=@p1,Phone=@p2,fax=@p3,Mobile_Number=@p4,DOJ=@p5,opening=@p6,Remark=@p7,Address=@p8,city=@p9,state=@p10,zip_code=@p11,email=@p12 where Agency_code=" + textBox1.Text, this.con );
                            cmdupdate.Parameters.AddWithValue("@p1", textBox2.Text);
                            cmdupdate.Parameters.AddWithValue("@p2", textBox4.Text);
                            cmdupdate.Parameters.AddWithValue("@p3", textBox3.Text);
                            cmdupdate.Parameters.AddWithValue("@p4", textBox8.Text);
                            cmdupdate.Parameters.AddWithValue("@p5", dateTimePicker1.Value.Date);
                            cmdupdate.Parameters.AddWithValue("@p6", textBox6.Text);
                            cmdupdate.Parameters.AddWithValue("@p7", textBox5.Text);
                            cmdupdate.Parameters.AddWithValue("@p8", textBox17.Text);
                            cmdupdate.Parameters.AddWithValue("@p9", textBox16.Text);
                            cmdupdate.Parameters.AddWithValue("@p10", textBox15.Text);
                            cmdupdate.Parameters.AddWithValue("@p11", textBox14.Text);
                            cmdupdate.Parameters.AddWithValue("@p12", textBox13.Text);

                            //con.con.Open();
                            cmdupdate.ExecuteNonQuery();
                            MessageBox.Show("Updated");
                            retrieve_data();
                            clearall();
                        }
                        else
                        {

                        }
                    }
                    else
                    {

                        if ((textBox1.Text != "") && (textBox2.Text != ""))
                        {
                            SqlCommand cmd = new SqlCommand("insert into Agency_detail values(@para1,@para2,@para3,@para4,@para5,@para6,@para7,@para8,@para9,@para10,@para11,@para12,@para13)", con);
                            cmd.Parameters.AddWithValue("@para1", Convert.ToInt64(textBox1.Text));
                            cmd.Parameters.AddWithValue("@para2", textBox2.Text);
                            cmd.Parameters.AddWithValue("@para3", Convert.ToInt64(textBox4.Text));
                            cmd.Parameters.AddWithValue("@para4", Convert.ToInt64(textBox3.Text));
                            cmd.Parameters.AddWithValue("@para5", Convert.ToInt64(textBox8.Text));
                            cmd.Parameters.AddWithValue("@para6", dateTimePicker1.Value);
                            cmd.Parameters.AddWithValue("@para7", Convert.ToDouble(textBox6.Text));
                            cmd.Parameters.AddWithValue("@para8", textBox5.Text);
                            cmd.Parameters.AddWithValue("@para9", textBox17.Text);
                            cmd.Parameters.AddWithValue("@para10", textBox16.Text);
                            cmd.Parameters.AddWithValue("@para11", textBox15.Text);
                            cmd.Parameters.AddWithValue("@para12", Convert.ToInt64(textBox14.Text));
                            cmd.Parameters.AddWithValue("@para13", textBox13.Text);
                            //con.con.Open();
                            cmd.ExecuteNonQuery();
                            retrieve_data();
                            clearall();
                        }
                        else { MessageBox.Show("Agency ID and Name Must Required"); }
                    }
                }
                catch (Exception ex)
                {
                    MessageBox.Show(ex.Message);
                }


    Deletion Of Data


    To Delete data or  record from database :- 

    1. Enter the Required fields :- ID and Agency Name of Record to be deleted 

    2. Then press delete button and data will be deleted

    3. It will be immediately shown as deleted in datagridview


    CODE For DELETE


     try
                {
                    SqlCommand cmd = new SqlCommand("delete from Agency_detail where Agency_code =@code", this.con);
                    cmd.Parameters.AddWithValue("@code", Convert.ToInt32(textBox1.Text));
                    //con.con.Open();
                    cmd.ExecuteNonQuery();
                    retrieve_data();
                    clearall();
                }
                catch (Exception ex)
                {
                  MessageBox.Show(ex.Message);

                }