INTRODUCTION
In this article i am going to show how to connect a csharp database with mysql database and how to perform basic operations like inserting record in database , delete a specific record from database , updating a specific record and viewing all data and binding the data to datagridview . Mostly with Csharp Applications you have used MSSQL database but we can also use mysql database for this purpose
DOWNLOAD MYSQL WITH CSHARP APP
REQUIREMENTS
- Visual Studio 2010 or Visual Studio 2012
- MYSQL Database installed with admin roles
- Dot/connector connec
WHAT WE ARE GOING TO COVER
In this Article we are going to cover the following points
- Connect Csharp with mysql
- Insert data in mysql database with Csharp code
- Delete data in mysql database with Csharp code
- Update data in mysql database with Csharp code
- Select data in mysql database with Csharp code
CREATING DATABASE
First of Start your Wamp server or Xamp server services This will start Phpmyadmin where all database or SQL related work will be done . Phpmyadmin will be used for create new database schemas and other database oprations are done.
- Start Wamp / xampp server
 |
| How to use mysql database in csharp |
- Then Click on phpMyAdmin as shown in Image above .
- Now you will get a screen like the image below

How to use mysql database in csharp - If you are using default password for Phpmyadmin then directly click on Go button . Then you will get a screen like below
- Then click on Databases as shown in image below to create a new database that will be required for this Application

How to use mysql database in csharp - Then you will get window as shown below Fill up the Database name and Click on Create button

How to use mysql database in csharp - After database is created Now Run the database script we have provided in this tutorial in next steps and run this script as shown in image below ........Just go to sql Tab and paste full script there.

How to use mysql database in csharp - Remember one thing use same name of database as i have given in the snapshot
DOWNLOAD DATABASE SCRIPT FILE
Database Script File
DOWNLOAD FULL PROJECT WITH CODE
Download Complete project How to use mysql database in csharp
DOWNLOAD MYSQL CONNECTOR DLL's FOR DOTNET
For connecting Mysql with Csharp in dotnet you must have connector . you require Connector/NET for mysql connectivity with csharp . you can download Mysql connector / Net from link below :-Download Dotnet connector for mysql and csharp
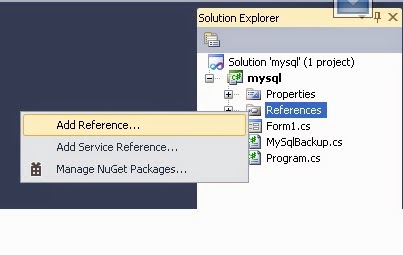
HOW TO USE MYSQL DLL's
STEPS :-
- Right Click on Solution Name
- In pop-up menu click on Add Reference
How to use mysql database in csharp - Now select Mysql.Data and Click ok

How to use mysql database in csharp - you can also browse for dll downloaded from Browse Tab

How to use mysql database in csharp - Now MySQL.Data dll file will be added successfully to solution .
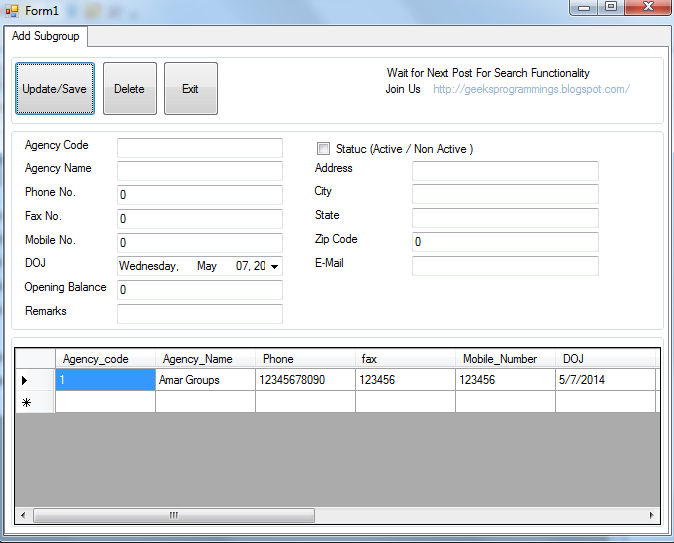
INSERT RECORD IN MYSQL DATABASE USING CSHARP CODE
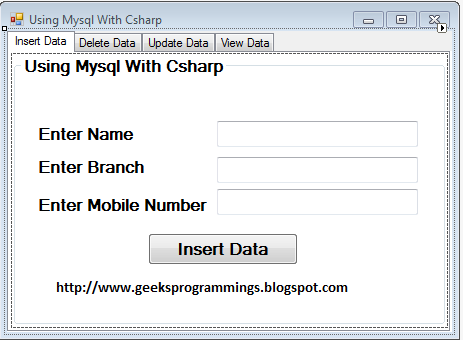 |
| How to use mysql database in csharp |
con.Open();
MySqlCommand cmd = new MySqlCommand("insert into table1(name,branch,phone) values(@name,@branch,@phone)", con);
cmd.Parameters.AddWithValue("@name", textBox1.Text);
cmd.Parameters.AddWithValue("@branch", textBox2.Text);
cmd.Parameters.AddWithValue("@phone", Convert.ToInt32(textBox3.Text));
cmd.ExecuteNonQuery();
con.Close();
MessageBox.Show("Record Inserted");
EXPLANATION :-
- First Connection is opened to mysql connection using connection string
- Then Using MySqlCommand class we are passing insert query to mysql database using con object that is used for establishing connection to mysql database
- Then @name,@branch,@phone are parameters given to query to dynamically pass data to query
- Then parameters are passed to query dynamically using following line of code
cmd.Parameters.Addwithvalue('parametername' , 'value' ); - cmd.ExecuteNonQuery is used to execute the query in cmd object to database
- con.close closes the connection to the database
DELETE RECORD IN MYSQL DATABASE USING CSHARP CODE
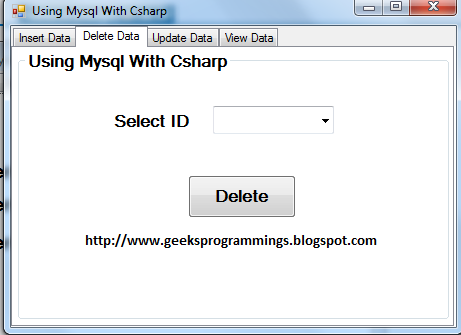 |
| How to use mysql database in csharp |
CODE :-
con.Open();
if (comboBox1.Text != "")
{
MySqlCommand cmd = new MySqlCommand("delete from table1 where id=@id", con);
cmd.Parameters.AddWithValue("@id", comboBox1.Text);
if (comboBox1.Text != "")
{
MySqlCommand cmd = new MySqlCommand("delete from table1 where id=@id", con);
cmd.Parameters.AddWithValue("@id", comboBox1.Text);
cmd.ExecuteNonQuery();
con.close();
EXPLANATION :-
- First Connection is opened to mysql connection using connection string
- Then Using MySqlCommand class we are passing insert query to mysql database using con object that is used for establishing connection to mysql database
- Then @id is parameter given to query to dynamically pass data to query
- Then parameters are passed to query dynamically using following line of code
cmd.Parameters.Addwithvalue('parametername' , 'value' ); - cmd.ExecuteNonQuery is used to execute the query in cmd object to database
- con.close closes the connection to the database
UPDATE RECORD IN MYSQL DATABASE USING CSHARP CODE
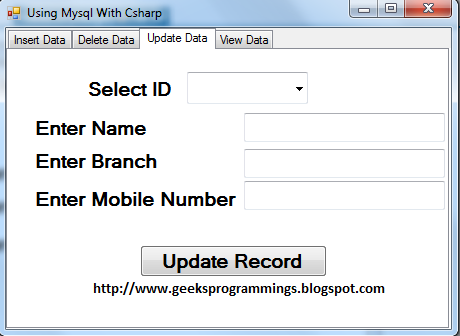 |
| How to use mysql database in csharp |
CODE :-
MySqlCommand cmd = new MySqlCommand("update table1 set name=@name,branch=@branch,phone=@phone where id=@id", con);cmd.Parameters.AddWithValue("@name",textBox6.Text );
cmd.Parameters.AddWithValue("@branch",textBox5.Text );
cmd.Parameters.AddWithValue("@phone",textBox4.Text);
cmd.Parameters.AddWithValue("@id",comboBox2.Text );
cmd.ExecuteNonQuery();
MessageBox.Show("Record Updated");
EXPLANATION :-
- First Connection is opened to mysql connection using connection string
- Then Using MySqlCommand class we are passing insert query to mysql database using con object that is used for establishing connection to mysql database
- Then @name,@branch,@phone,@id are parameters given to query to dynamically pass data to query to state which field value are to be replaced
- Then parameters are passed to query dynamically using following line of code
cmd.Parameters.Addwithvalue('parametername' , 'value' ); - cmd.ExecuteNonQuery is used to execute the query in cmd object to database
- con.close closes the connection to the database
SELECT RECORD IN MYSQL DATABASE USING CSHARP CODE
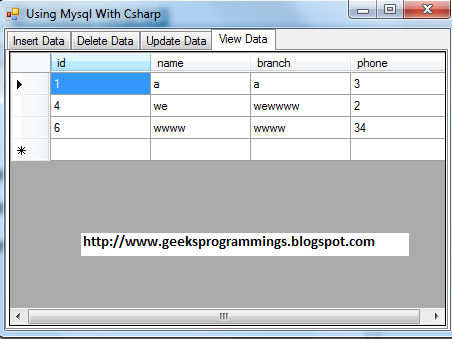 |
| How to use mysql database in csharp |
CODE :-
MySqlCommand cmd = new MySqlCommand("select * from table1 where id=@id", con);
cmd.Parameters.AddWithValue("@id", comboBox2.Text);
MySqlDataAdapter da = new MySqlDataAdapter();
da.SelectCommand = cmd;
DataTable dt = new DataTable();
da.Fill(dt);
if (dt.Rows.Count > 0)
{
textBox6.Text =dt.Rows [0][1].ToString ();
textBox5.Text =dt.Rows [0][2].ToString ();
textBox4.Text = dt.Rows[0][3].ToString();
}
EXPLANATION :-
- First Connection is opened to mysql connection using connection string
- Then Using MySqlCommand class we are passing insert query to mysql database using con object that is used for establishing connection to mysql database
- Then @name,@branch,@phone,@id are parameters given to query to dynamically pass data to query to state which field value are to be replaced
- Then parameters are passed to query dynamically using following line of code
cmd.Parameters.Addwithvalue('parametername' , 'value' ); - Then we have used MySqlDataAdapter that act as a pipeline between database and csharp app . It takes or select query from csharp application and then make interface or link to database and execute the query in database and get result returned by query executed in database
- Then it fill the returned result in placeholder called DataTable that saves data returned from or retrieved from database into tabulated form
- Now if (dt.Rows.Count >0) checks if dt contains some item then put the data in respective text fields
Full Code For Insert update delete and select Data from Mysql in Csharp Application ( C# )
using System;

using System.Collections.Generic;

using System.ComponentModel;

using System.Data;

using System.Drawing;

using System.Linq;

using System.Text;

using System.Windows.Forms;

using MySql;

using MySql.Data;

using MySql.Data.MySqlClient;


namespace mysql

{

    public partial class Form1 : Form

    {

       public  MySqlConnection con = new MySqlConnection("server=localhost;Uid=root;pwd=;Database=sqldotnet");

        public Form1()

        {

            InitializeComponent();

        }


        private void Form1_Load(object sender, EventArgs e)

        {

            retrieve();

        }

        public void retrieve()

        {


            {

                MySqlCommand cmdsel = new MySqlCommand("select *  from table1 ", con);

                MySqlDataAdapter dasel = new MySqlDataAdapter();

                dasel.SelectCommand = cmdsel;

                DataTable dtsel = new DataTable();

                dasel.Fill(dtsel);

                dataGridView1.DataSource = dtsel;

            }

            {

                int cnt = comboBox1.Items.Count;

                for (int counter = 0; counter < cnt; counter++)

                {

                    comboBox1.Items.RemoveAt(0);

                    comboBox2.Items.RemoveAt(0);

                }

            }

            MySqlCommand cmd = new MySqlCommand("select id  from table1 ", con);

            MySqlDataAdapter da = new MySqlDataAdapter();

            da.SelectCommand = cmd;

            DataTable dt = new DataTable();

            da.Fill(dt);

            if (dt.Rows.Count > 0)

            {

                int cnt = dt.Rows.Count;

                for (int counter = 0; counter < cnt; counter++)

                {

                    comboBox1.Items.Add(dt.Rows[counter][0].ToString());

                    comboBox2.Items.Add(dt.Rows[counter][0].ToString());

                }

            }

            comboBox1.Text = "";

            comboBox2.Text = "";

        }


//Delete Record

        private void button2_Click_1(object sender, EventArgs e)

        {

            con.Open();

            if (comboBox1.Text != "")

            {

                MySqlCommand cmd = new MySqlCommand("delete from table1 where id=@id", con);

                cmd.Parameters.AddWithValue("@id", comboBox1.Text);

                cmd.ExecuteNonQuery();

                retrieve();

            }

            MessageBox.Show("Record Deleted");

        }

//select Data

        private void comboBox2_SelectedIndexChanged(object sender, EventArgs e)

        {

            MySqlCommand cmd = new MySqlCommand("select * from table1 where id=@id", con);

            cmd.Parameters.AddWithValue("@id", comboBox2.Text);

            MySqlDataAdapter da = new MySqlDataAdapter();

            da.SelectCommand = cmd;

            DataTable dt = new DataTable();

            da.Fill(dt);

            if (dt.Rows.Count > 0)

            {

                textBox6.Text =dt.Rows [0][1].ToString ();

                    textBox5.Text =dt.Rows [0][2].ToString ();

                    textBox4.Text = dt.Rows[0][3].ToString();

            }

        }

//Update Data

        private void button3_Click_1(object sender, EventArgs e)

        {

            MySqlCommand cmd = new MySqlCommand("update table1 set name=@name,branch=@branch,phone=@phone where id=@id", con);

            cmd.Parameters.AddWithValue("@name",textBox6.Text );

            cmd.Parameters.AddWithValue("@branch",textBox5.Text );

            cmd.Parameters.AddWithValue("@phone",textBox4.Text);

            cmd.Parameters.AddWithValue("@id",comboBox2.Text  );


            cmd.ExecuteNonQuery();

            MessageBox.Show("Record Updated");

            retrieve();

        }

//Insert Data

        private void button1_Click_1(object sender, EventArgs e)

        {

            con.Open();

            MySqlCommand cmd = new MySqlCommand("insert into table1(name,branch,phone) values(@name,@branch,@phone)", con);

            cmd.Parameters.AddWithValue("@name", textBox1.Text);

            cmd.Parameters.AddWithValue("@branch", textBox2.Text);

            cmd.Parameters.AddWithValue("@phone", Convert.ToInt32(textBox3.Text));


            cmd.ExecuteNonQuery();

            con.Close();

            MessageBox.Show("Record Inserted");

            retrieve();

        }

    }

}